Showing posts with label crocheting. Show all posts

Wednesday, December 14, 2016

• 1845 Brown Dress, Finished at Last!!! •


This post may just be near the top of the list of my favorites for the whole year, so prepare yourself for an awful lot of photos.  ;)   After finishing a custom order and making a few skirts, I found myself in the mood for a nice, easy historical project!  Enter the 1845 brown dress, which I had started about a year and a half ago, and had the dress assembled except for attaching the bodice to the skirt.   I measured the bodice length of my blue floral 1860s dress and used it as a guide for this one, added piping, and sewed it together!  


Ever since I first started this dress, I wanted to get pictures of it in the winter, at a really nifty historical location.  Then this summer while at our county fair, I ended up going into this cute little cabin that they have on the fairgrounds, in which a lady was doing a loom presentation.  I knew right then that I had found my "nifty historical location," but still was unsure whether it would be accessible in the winter.  As it turns out, the drive into the fairgrounds was plowed, as was a path up to the cabin, but the snow around the cabin itself lay untouched and pristine.  With no people around (that deserves a definite hurrah!!!!!), it made for perfect pictures.  :D


My mom let me borrow her bonnet and cape, since hers are in burgundy tones rather than blue, like mine.  :)


When I originally got this fabric, I only had 6 yards.  Out of that I got the whole dress, including bias for all of the piping.  Since there was a shortage, I cut the skirt cross-wise on the fabric (one continuous piece), and it measures about 135" around.  Since I cut it that way, however, and was doing cartridge pleats which require a fold-over at the waist edge, I ended up making about a 3/8" seam at the hem when I sewed on the hem facing so that it would be long enough.  It may be a little bit shorter than your average 1840s dress, but apart from the historical correctness, or lack thereof, I really like the length!  Much easier to walk around in, and, well, it shows off my fabulous boots.  ;)


For the bodice, I used old faithful Simplicity 1818 (see other projects I've made from that pattern here), changing the front opening to a back one, and using Butterick 5831 for the sleeves, with a wide cuff.


I *love* piping!!  Not so much the sewing with it (hehe), but definitely the finished look of it.  Perhaps that is one of the benefits of creating a UFO an then finishing it; you forget all the painful details that went into it at first!  ;)

The cuffs close with hooks and eyes at the wrist. 


This is my first official garment featuring cartridge pleats!!!  In the past I have been highly skeptical of them, and just always pictured the dress coming apart the first time I wore it, but I'm beginning to think they might just be a safe option after all.  ;)  Since the skirt is not super full, the pleats don't look quite as full as they could, but I still absolutely love them.  Naturally, when I first started the dress, I used (ready for this?) plain cotton sewing thread to make the cartridge pleats.  Hehehe.  Only after I finished making them did I read that you MUST use button & craft thread or a suitable alternative. Proof of that was when I tried the skirt on for the first time and heard a very suspicious "snap."  Needless to say, I bought button & craft thread and proceeded to re-do my pleats.  ;)


Now for the best part of the whole outfit!!!!!!  The pelerine!!!!!!!!!  ;D

The bodice of the dress is not necessarily quite perfect for the 1840s; I need to do some more research, but for the great majority of the time, dresses of that period had fan-front bodices.  But since I started this before I knew much at all about the period, I can forget that just fine.  ;)

Ever since the start, I pictured making "one of those pelerine things" with ruched trim on it to go over this dress.  Well, after I finished my dress, I decided that it just needed that "pelerine thing" to make it complete, so whipped one up the day before we took these pictures.


This fabric went on clearance a few months back, so I was able to purchase some more for a pelerine.  I used the dress bodice pattern as a pattern for it, and just made it to the shape and length that I wanted.  It worked quite well, and I love how it looks.  :D

The ruched trim consists of 4 widths of fabric cut 3.25" wide, with the raw edges turned under .5", and gathered up with one basting line on each edge.  After pinning it on for ages and getting the sorest back of my life, it was ready to sew.  Since I was in a hurry, I just went ahead and machine-stitched the trim on.  The rest of the dress was machine-stitched on the inside, but all visible sewing was done by hand. 


The pelerine is lined with self-fabric, and so far has just been pinned together at the front neck edge.  Eventually I'll sew a hook and eye onto the neck edge, but for the time being I've had my fill of said occupation.  ;)


My "evening project" last week was sewing hooks and eyes onto this dress for the back opening and the cuffs.  


There are something like 14 hooks and 14 eyes on the back of the dress, plus two of each on each sleeve, and the hooks had to be sewn on super neatly because they would show on the outside.  As a result, it took a dreadful amount of time to do each one, but it was quite definitely worth it.  :)  Can't even see them on there now!!


I think I might just move into this little cabin.  Perfect house for a historical seamstress to live in, right?  ;)


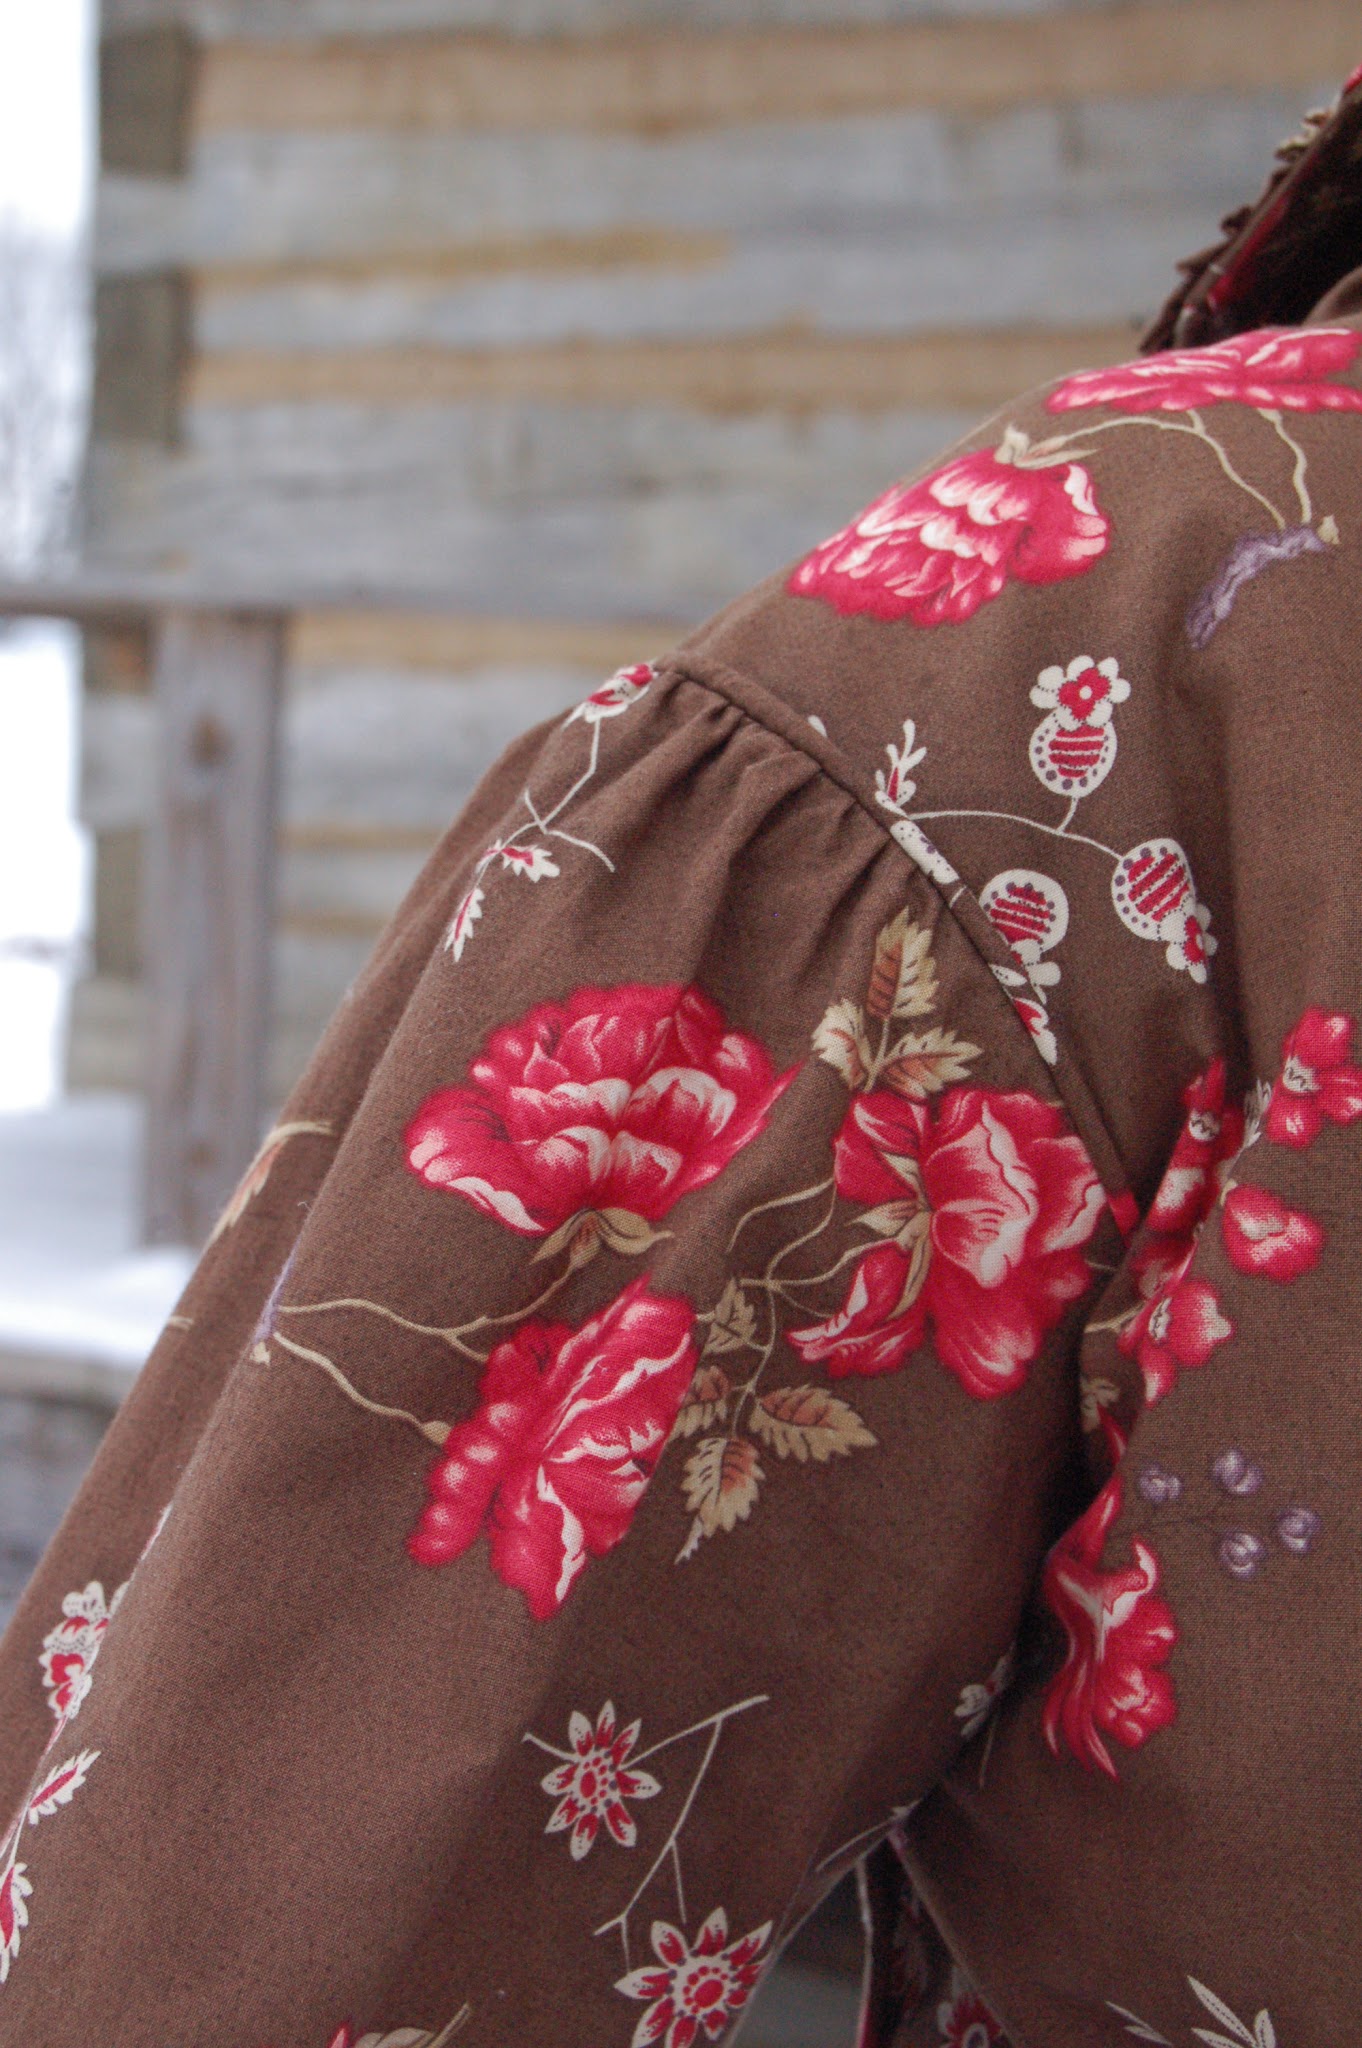
The sleeve seams, cuffs, side seams, shoulder seams and back seams are all piped, and the waist edge is piped with a double piping.  I have not yet tried piping a neckline yet, but need to for sure!


The hem of the dress is faced with a separate facing, as I stated earlier.  I used plain white muslin, and cut it to be a finished width of 12".


Back on with the cape!  :)  I am not sure yet if these mittens are quite period-correct, but they may just be.  I made them several years back, with no pattern!!!!!!!!  I have no idea how I did that, and even less idea how I managed to make two of them end up the same size, but I love them anyhow.  ;)


Beneath the dress are my 1860s underpinnings, with a total of four gathered (three of them also corded) petticoats.  They are sadly not starched at present, so aren't as fluffy as they could be, but still were decently fluffy.   And they provided a very nice barrier from the cold temperatures outside!!  The fun part was, unlike any time wearing historical garments in the past, I didn't get overheated one single time when wearing this outfit.  THAT is worth getting excited about.  ;D


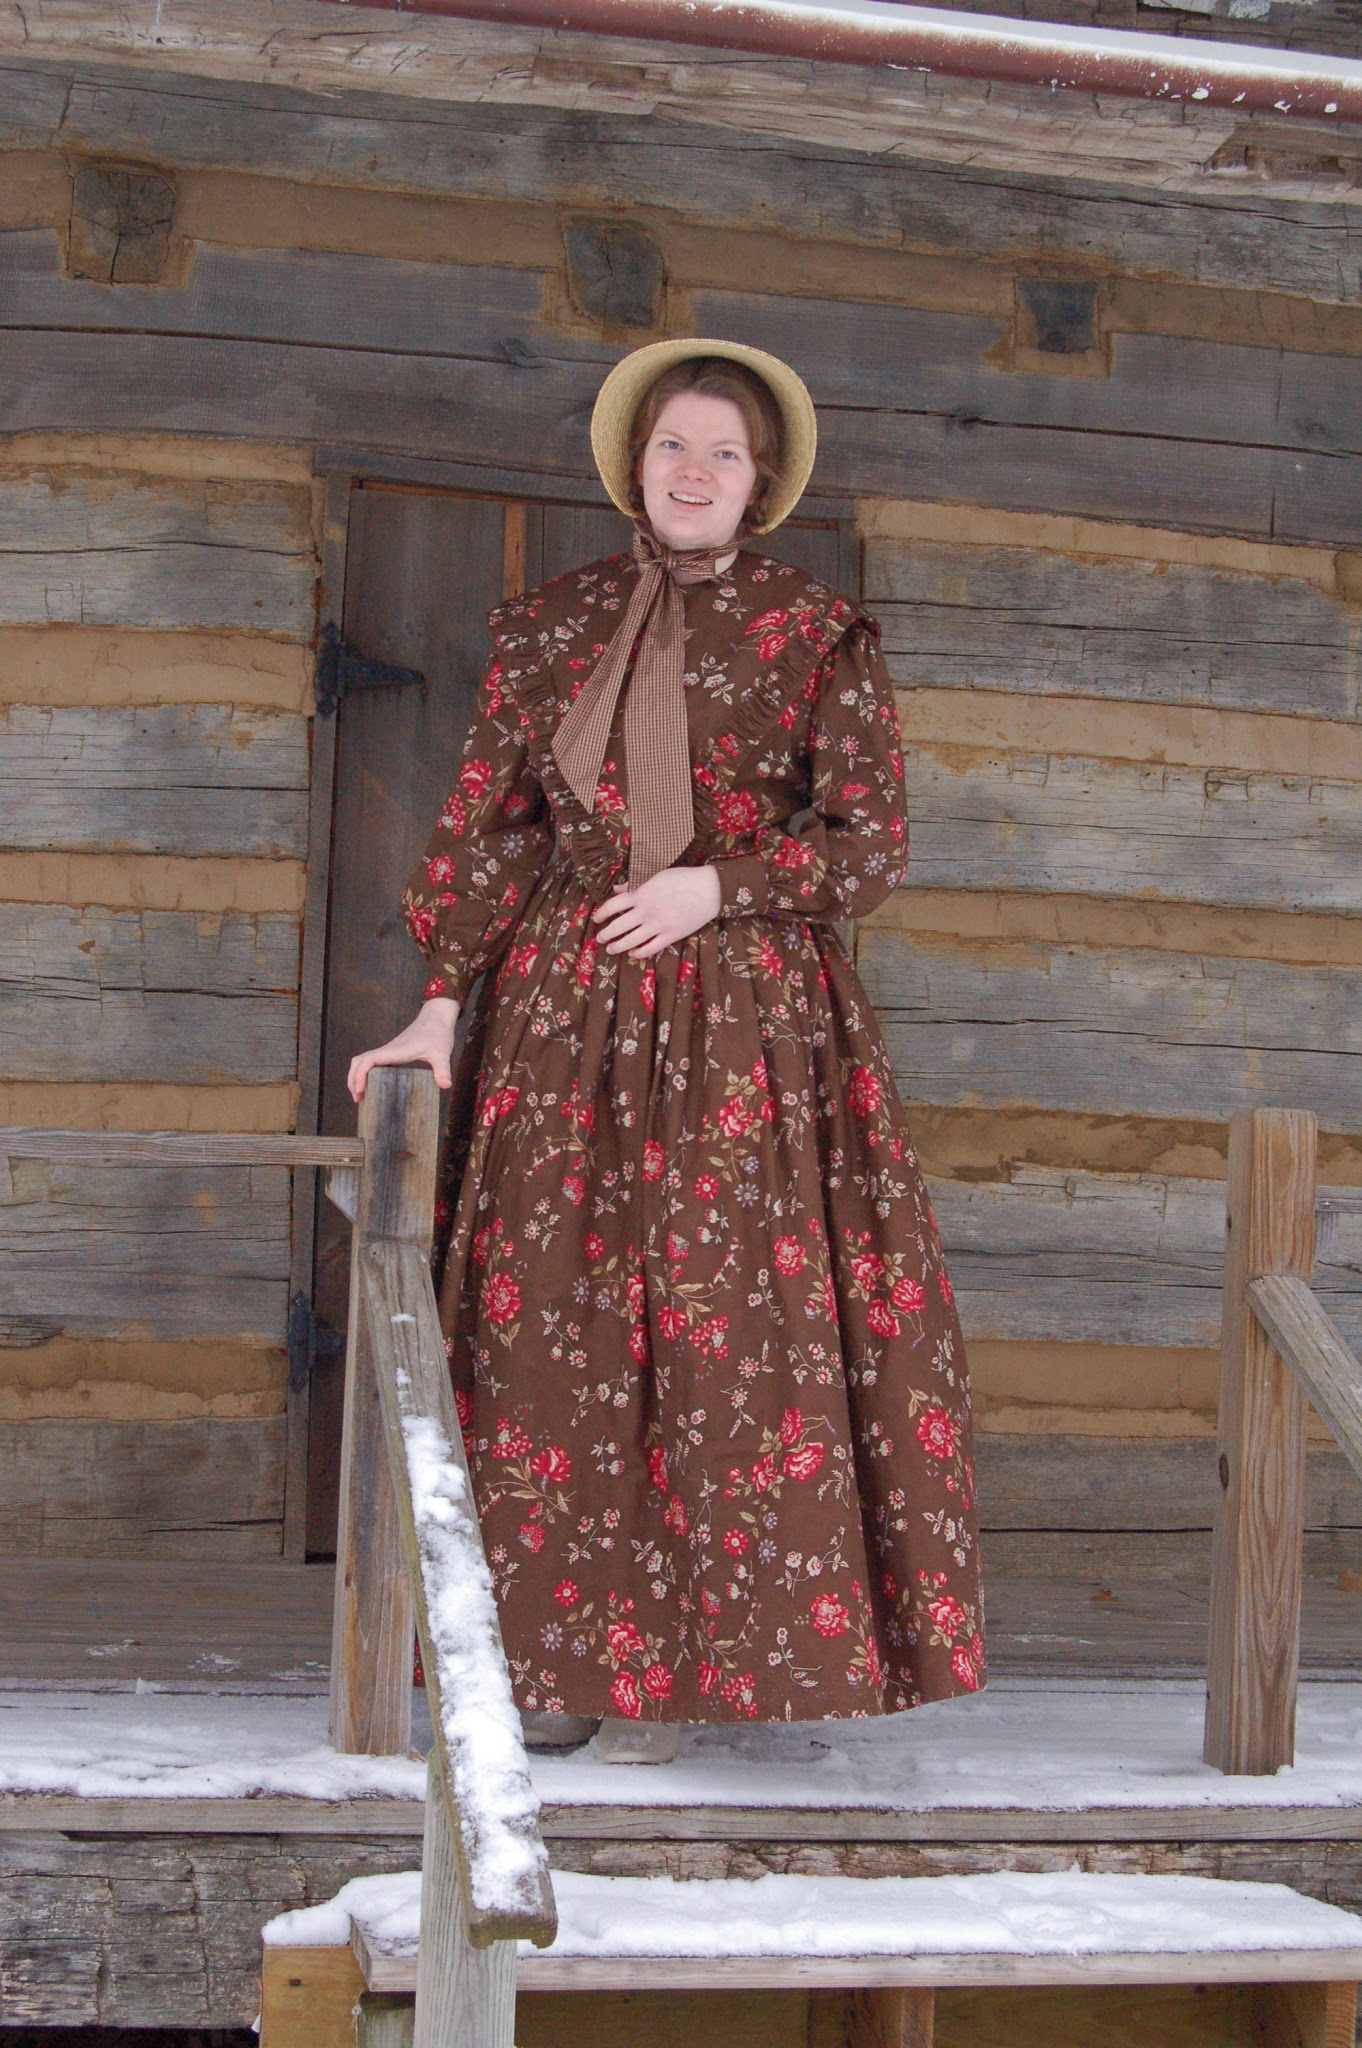
The most necessary boot picture.  ;)  They are Renoirs from American Duchess, and I love them *SO* much.  So comfortable and durable, and downright beautiful.


And lastly, my attempt at a daguerreotype, which resulted in not much other than blurring out my face.  Oh well.  Perhaps that is a benefit, eh?  ;)

Thanks so much for stopping by!!
Follow Me on Pinterest

Thursday, October 17, 2013

Simple Elegant Doily


Hook size: G
Yarn: Any Category 1 Fingering Weight yarn. I'm not sure what mine was - it was just a miscellaneous ball of yarn!
Finished Dimensions: 12 1/2 inches in diameter
See this video for a treble crochet stitch tutorial
ch=chain  sl st=slip stitch  sc=single crochet  st=stitch
~~~~~~~~~~
Round 1: Ch 3. Join to first ch with sl st.
Round 2: Ch 2. 18 treble crochet into circle. Join to ch 2 with sl st.
Round 3: *Ch 4. Skip 1 treble st, sc into next st. Repeat from * to first ch 4. 1 sc into same treble st as you started in.
Round 4: 8 sc into each ch 4 loop.
Round 5: Sl st up to 4th sc from hook. *3 treble crochet into next st. 3 treble crochet into next st. Ch 4. Repeat from * to first treble stitch and join with sl st.
Round 6: Ch 2, 1 treble crochet into each treble st. Join to ch 2 with sl st.
Round 7: *Ch 8. Sc in 5th stitch from hook. Repeat from * to last 3 st. Ch 8. Sc into 3rd st from hook.
Round 8: *16 sc into each ch 8 loop. Repeat from * until first loop is reached. Sl st into first sc.
Round 9: Sl st up to 7th sc from hook. *2 treble crochet into each of the next 3 st. Ch 5. Repeat from * until first treble st is reached. Sl st to first treble st.
Round 10: Ch 2. *1 treble crochet into each treble st. 5 treble crochet into each ch 5 space. Repeat from * until the ch 2 is reached. Sl st to top of ch 2.
Round 11: Ch 2. *2 treble crochet into next st. 1 treble crochet into each of next 13 st. Repeat from * until the ch 2 is reached. Sl st to top of ch 2.
To finish: Pull end of yarn through and knot once. Weave in ends and steam.

~~~~~~~~~~
Yayyy!! I'm featured on Totally Tutorials!!

Follow Me on Pinterest

Thursday, March 7, 2013

Crocheted Chevron Zig-Zag Afghan

Crocheted Zig-Zag Afghan


Hook size H

Yarn: any worsted weight yarn, approximately 3 pounds in 3 colors

Abbreviations: sk=skip sc=single crochet BO=bind off

Row 1: Ch 187.

Row 2: Sc into each of first 6 chains, 3 sc into 7th chain. *6 sc, sk 2, 6sc, 3sc into next ch.* Repeat from * to * until end of row is reached. Repeat this sequence until you obtain 8 rows of this color. Change colors, and repeat until you have 22 consecutive stripes, beginning and ending with the same color.
BO. Weave in ends.
Follow Me on Pinterest

Tuesday, February 26, 2013

Finished Project: Crocheted "Bubble" Blanket


I finally finished another Crocheted "Bubble" Blanket!! It took me a long time  little while, but only because I was trying to make about a hundred things at once. It is not difficult at all, and really works up pretty fast if you stick to it. Here's some pictures and the info of how I made it! See the tutorial here (my afghan page). You have to scroll waaaaayyyy down towards the bottom of the page, and you'll see it. It's also on Ravelry. Note that you will be making this bigger than the one in the pattern because this is a queen-size afghan, so see the info below for how much bigger to make it.
Info for the purple, beige and burgundy one:
32 skeins Vanna's Choice (I used Burgundy, Beige, and Purple in that order) Remember to finish with the same color that you begin with. Use hook size I.
There are 11 stripes of burgundy, 10 beige, and 10 purple. (The 32nd skein is for the edge).
 Ch 224. Follow the directions for the rest of the afghan, remembering that there will be 31 stripes.
 I used burgundy for the border. It is basically just a small shell stitch. I only did the border on two sides of the blanket (NOT the beginning and ending edges). 
For the edge (border): Dc 3, 1 sc in next stitch, *dc 3 in next stitch, 1 sc in next stitch. Repeat from * until you reach the end. Repeat on the other side of the blanket.
Finished dimensions: 74" wide by 67" long. 

Hook Size H
Yarn: any worsted weight yarn, 4 colors
Abbreviations: sk=skip ch=chain sc=single crochet dc=double crochet tc="triple" crochet BO=bind off
"Triple" Crochet: wrap yarn around hook. Insert hook into stitch. Wrap yarn around hook and pull through. Three loops on hook. Wrap yarn around hook and pull through one loop. Wrap around again and pull through another loop. Wrap around again and pull through last loop. You have just made a "triple" crochet stitch.
Row 1: Ch 200.
Row 2: Sc into second ch from hook. Then, in the same hole, dc, and then tc. *Sk three ch, and repeat, making a sc, dc, and tc.* Repeat from * to * until you have reached the end of the row. Ch 1, turn. Repeat row 2 five times, making 6 "bubble" rows. Change colors. Repeat until blanket reaches desired width.
Finishing: After making 6 rows of the last color, ch 1, turn, and 1 sc into each stitch all the way across for a more finished look. BO. Full sized blanket should have 21 consecutive colored rows, beginning and ending with the same color.


Follow Me on Pinterest

Friday, February 22, 2013

Crocheted Scrubbie


Crocheted Scrubbie

Hook size I
Material: netting, available at any fabric or craft store
Abbreviations: ch=chain sc=single crochet sk=skip

Cut netting into 2 inch strips, and tie together.
Ch 3. Connect with 1 sc. 1 sc in same hole, then 2 sc in each stitch until piece is about 2/3 of what you want your diameter to be. 1 sc in each sc until desired diameter is reached. Then, decrease every other stitch for a round, sc a round, decrease every other stitch for 2 rounds, until you are almost done. Then, sk 2 or 3 sc until hole is closed. Tie off end, and push into the inside of the scrubbie.

You can use several different colors, if desired, to make this a colorful, useful utensil for your kitchen.
Follow Me on Pinterest

Friday, January 25, 2013

Crocheted Baby Headbands

So.....a while back I was making some flowers for headbands, and other baby stuff for a friend of mine. I decided to whip up a few for any babies I might run into. These make a very nice gift for any little baby (well, any baby girl). They are very easy and fast to make, and you can find pre-made headbands at Walmart or any craft store. Otherwise you can buy a roll of the elasticy stuff and sew them up yourself. Here's some pictures, and at the end is the pattern. Enjoy!


And....here's the pattern! If you have any problems understanding them, please let me know!


 You will need:
sport or baby-weight yarn
stretchy headband material or pre-made headband (available at Walmart)
size F or G crochet hook.


Big Flower:
Ch 8. Join with sl st in first ch.
16 sc into ring. Join with sl st into first sc.
*Ch 7. Skip 2 sc. Sl st into next sc.
Repeat from * til you reach first "Ch 7."
Join to base of first "Ch 7" with sl st.
Ch 1.
*10 sc into "ch 7" loop. Join to base of "ch 7" with sl. st. 
Repeat from * til you reach first loop. Join to "ch 1" with sl st.
Ch 2.
*Dc into each sc. Sl stitch into the stitch that is "between the loops." (between the "petals" of the flower)
Repeat from * until you reach first Dc. Sl st into 2nd chain of "ch 2."
BO, leaving tail.

Medium Flower:
Ch 5. Join with sl st into first ch.
15 sc into ring. Join to first sc with sl st.
Sc into back loop only of each sc. Join to first sc with sl st.
*Ch 3. Sc into next sc. Repeat from * until you reach first "ch 3." Join with sl st into first ch in "ch 3."
BO, leaving tail.

Small Flower:
Ch 3. Join with sl st into first ch.
10 sc into ring. Join with sl st into first sc.
*Ch 3. Sc into next sc. repeat til you reach the first "ch 3".
Join into first ch of "ch 3" with sl st.
BO, leaving tail.

Thanks for visting, folks!


Follow Me on Pinterest

Tuesday, January 8, 2013

"Ribbed" Crocheted Hat


"Ribbed" Crocheted Hat


Hook size H


Yarn: “I Love This Yarn,” one skein or one skein of any worsted weight yarn


Abbreviations: ch= chain sc= single crochet BO=bind off

Row 1: Ch 37.

Row 2: Sc into second ch from hook and into remaining ch all the way across. (36 sc)


Row 3: Sc into front loop only of each sc all the way across.

Repeat Row 3 thirty-eight times or until hat fits comfortably around your head.

BO, leaving long tail. Join edges, and tie off end. Then, using the same tail, weave through every other stitch in the top of the hat, cinch it, and tie it off. Weave in ends.
Follow Me on Pinterest

Saturday, January 5, 2013

Crocheted V-Stitch Shawl

Crocheted V-Stitch Shawl

Hook: size G

Yarn: Caron Simply Soft, approximately 5 skeins, depending on desired size

Abbreviations: ch=chain sk=skip dc=double crochet BO=bind off

Row 1: Ch 103.

Row 2: Double crochet into 4thchain from hook. Ch 1, then dc into same hole. Sk 2, and repeat *dc, ch 1, dc* until end of row is reached. Ch 1, turn. Repeat from * to * until piece reaches approximately 75 inches long, or however long desired. BO. Weave in ends.
Follow Me on Pinterest