Showing posts with label easy. Show all posts

Friday, February 21, 2014

The 1 Hour Skirt

Have you ever gotten that "I-must-make-something-NOW" feeling? Well, I got it today. So I made something. AND, it isn't just an apron either! It's an actual piece of clothing. Shocked? 
~~~~~~~~~~~~~~~~
I wanted something super-duper fast, so I checked over at Make it Perfect and found this pattern. I didn't actually use her pattern, but I got the whole idea of the elastic waist from her. I used a heavy-weight knit (part of the ever-growing stash), and some 1 1/4" stretchrite elastic. To get the shape I wanted, I just traced a skirt that I have. Ideally, it was going to be a maxi skirt, but seeing as I had only 1 1/2 yards of fabric, if that, I settled for a midi. I sewed up the edges with a medium zigzag and then just left them - knit doesn't ravel, after all! The waistband I sewed together with a regular stitch (obviously), and then sewed down the ends as well.


For the hem, I serged the edge and then hand stitched it up. That was the time-consuming part. However, with some Bonanza cranked up, it went pretty fast.
^that picture makes it look kinda blech!??^ 


If you are looking for an easy, fast skirt, this is it!
Thanks for stopping by!
P.S. Garden Apron pictures coming soon....taking pictures of something garden-related in February with snow all around and no vegetables, green grass or spring-like materials at hand is a slight challenge. :|


Follow Me on Pinterest

Friday, January 17, 2014

Unfinished Friday: The Easy Bib


Sounds like a really great title, eh? Well, the fact is, the project is almost finished. All it needs is some velcro and some knot-tying. 
I snagged this cute pink polka dot flannel at Walmart, of all places, for $1.85. It was in the remnants bin, so I figured I might as well grab it. As it turns out, it's soft and fairly decent quality, even after washing. 
I dug out a bib that I liked, traced it, sewed, and out came this bib.


It is just a tad crooked and uneven, but hey, what do expect when you're hurriedly sewing with no lights on? I was in such a hurry, I had no time to turn on the lights. In any case, with some lights on and a little more precision, this will be perfect. The double layer of flannel is the perfect thickness, makes it reversible, and oh-so-soft! I can't wait to make some more. Hint: I got some Riley Blake chevron AND some elephants. 


I'll have the tutorial up in a few days. Meanwhile, happy crafting! Thanks for stopping by!


Follow Me on Pinterest

Friday, November 15, 2013

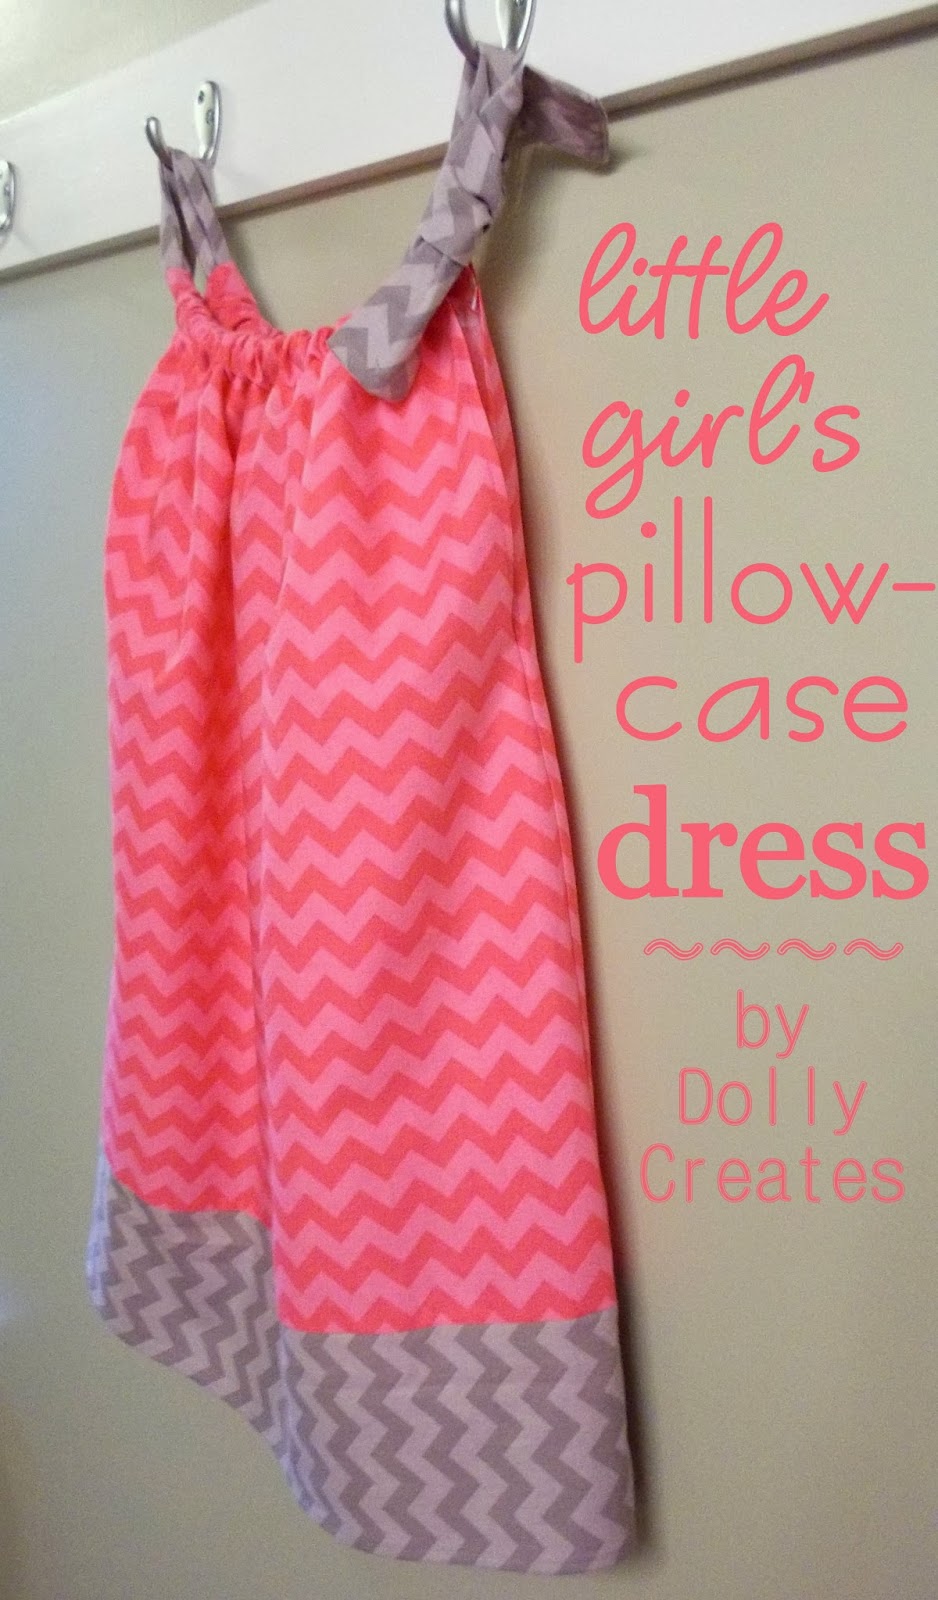
Little Girl's Pillowcase Dress


 So....I really wanted to make some sort of piece of clothing for a kid, BUT I needed something fast and easy. 
Out came the Little Girl's Pillowcase Dress! It's super cute, super duper easy, and it's really fast to make. 
I apologize for the horrible strange quality pictures. The lighting was bad, 
and I had the color vibrancy turned up from a previous photo shoot, so it totally was too bright with all that pink chevron. Oops!!
Since I don't have a little girl to model for me, the pictures don't do this lil' dress justice, but it is seriously cute. 
You can make this in pretty much any size you want just by lengthening, widening, etc.
UPDATE: If you make the dress the size I did, it will fit anywhere from a 3-5 year old, depending on how long you like to have dresses. I prefer them to be below the knee, in which case this would be perfect for a 3-4 year old.
Note: I say "serge or sew" in some places in this tutorial. I serge because we have a serger, but if you don't, just sew the seams at about 3/8". 
I used Riley Blake chevron in gray and pink, with the gray going vertically, while the pink is horizontal.
To begin:
Cut out the pieces as follows:
2 main body pieces: 20 1/2" x 23 1/2" each
2 hem pieces: 4 7/8" x 23 1/2" each
1 neck-tie piece: 3 7/8" x 43"

Iron under the bottom edge of your hem pieces 1/4". Iron under again.
Make sure you treat the selvage (finished ~ NOT cut) edges as the top of your main body piece.
Iron under the side arm seam about 1/4", down to 10 1/2" from the bottom as shown in the picture. Iron under again.

Sew the hem on your bottom hem pieces right next to the edge as shown in the picture below.

Sew the arm seams right next to the edge, like you did on the hem pieces. I found that it was easier to start on the <--- bottom of the armhole, ending at the top. (Yes....my seam is shamefully crooked. That's what happens when you hurry. Don't hurry. Or you end up with a uh...shabby chic seam, as I like to call it.)

Serge or sew each hem piece to each main piece with right sides together, making sure you are sewing the raw edges together, not the hemmed edges!

Serge or sew the body pieces together, with right sides together, matching up the bottoms exactly. Start on the bottom, ending at the armhole seams. Just veer out to the edge once you reach the armhole seams. It's a lil' tricky, but you can do it. 

Iron under the top of each main body piece about 1 3/4".

Sew the seam about 1/4" or so from the edge, as shown. 

Serge or sew the neck-tie piece, with right sides together, leaving one end open.

Turn right side out and press out the seam with a metal ruler, or some un-melty object.

Feed the end through your body piece, and DONE! Hooray! Now to ruin your day: tie the ends and feed them through the fabric. I know. It's really not fun. Once you're done though, it's super rewarding.
~~~~~~~~~~~~~~~~~~~~~~

~~~~~~~~~~
Thanks so much for stopping by! Check back again soon for more cute projects. You can subscribe by e-mail or on Bloglovin above on the right. Follow me on Pinterest by clicking this link.
Follow Me on Pinterest

Friday, March 29, 2013

Easy Half Apron


Easy Half Apron


~This looks like a long, hard pattern but it is actually very easy!
You will need:
1 piece of fabric of your choice 44 x 20 in. (main piece)
1 piece of coordinating fabric 22 x 4 1/2 in. (waistband)
2 pieces of fabric (matching or a contrast color - I used white) 31 x 4 1/4 in. (ties)

Make sure you start out with washed and ironed fabric!
1. Mark the half and quarter way points on your apron and waistband. (this helps you line them up perfectly later on) Mark your tie pieces on one end 1/4 inch from the bottom edge and 5/8 inch from the end.
hem on bottom and side
2. Press under 1/4 inch on bottom and sides of main apron piece. Press under 1/2 inch on bottom and sides. (so you have a doubled over hem)
3. Sew seam a comfortable distance from the edge (about 1/8 in.) on the three pressed under edges.
4. Machine baste top edge of apron 3/8 in. from edge, and then a second time 5/8 in. from edge, leaving long tails. (try to start and finish at approximately the same distance from the edge on both lines)
5. Gather top edge. (pull the front OR back strings {not both} simultaneously while gathering the fabric) Be sure to pull evenly on both strings on each end in order to have a nice even gather.
6. Press under 3/8 in. on the unmarked edge of the waistband.
7. Place your waistband on a flat surface with the right side facing you and the pressed under edge down (so you have a plain edge up).
8. Now put your apron piece with the right side down (so that you have right sides together) onto your waistband piece.
9. Line up your halfway point marks and pin. Next pin the ends together so that the waistband sticks out 5/8 in. beyond the apron piece on both ends. (this allows you to sew the tails on later without having to redo it like I did!!)
10. Next, pin your quarter way points together. Keep pinning, dividing each section in half and pinning it there so that it is even. You may need to make it more or less gathered (by pushing the fabric towards the ends of the strings) in order to make it even.
11. Once you have it all pinned (the pins should be about 1 to 1 1/2 inches apart), sew the seam just past the 5/8 inch gather line. (try to sew pretty close to it but don't sew right over it or you won't be able to take it out).
12. Remove your baste stitches by pulling on one or the other of them until they are out.
13. Sew over your seam that you sewed in step 11 again (just for safety's sake so that it is VERY secure). Tie ends. (or you can backstitch and then go forward again...or both ;)
14. Now take your tie ends and fold them in half lengthwise with right sides together. Sew seam 3/8 inch from edge, leaving the end with the dot open to turn it right side out. Once you have sewed that seam, go back to the end that you sewed together and resew it from the edge around the corner about 1 inch, and then turn around and go back to where you started. (confusing?!!) This is to secure the edge for when you turn it. Now sew the other tie just like this one, and tie the threads on the edge that you started on.
15. Trim the corners and seams. (trim corner not too close to stitches but pretty close - about 1/4 inch is fine) When you trim the seams - just trim one of the edges of fabric about 1/8 inch so that it lays flat.
16. Turn ties right side out and iron. You may want to use something flat to push the seam out flat because it really doesn't like to otherwise.
17. Baste the open ends of the ties together 5/8 in. from the edge. (this is on the right side)
18. Now take the apron piece and lay it down with the right side facing you, and place the tie ends (with the right side facing you if there is a right side to your ties) down on the waistband with the raw edges and bottom edges even.
19. Baste the tie ends to band right over the other baste seam or just to the inside of it.
slip stitched edge of waistband

20. Fold band with right sides together. Make sure your ties are sticking towards the middle. Sew the ends together (twice so they hold good) and tie threads. Trim seams and corners (optional).
21. Turn band so it is right side out. Iron so that the tie ends are out and the waistband edge comes down just far enough to cover the seam.
tie meets waistband
22. Slip stitch the pressed under edge of the band to the back of the apron just below the seam. I used double thickness of thread because ~just in case you can't tell~ I like seams to hold :)
23. Put on your apron with right side facing out :D Enjoy!!!!




Follow Me on Pinterest