Showing posts with label skirt. Show all posts

Wednesday, January 18, 2017

1950s • Winter Woolens


First off, thank you all so very much for your overwhelmingly kind comments from last week's post.  You don't know how much that meant to my mom and I!!  You all are the best, and I'll never forget your kindness.  <3

--

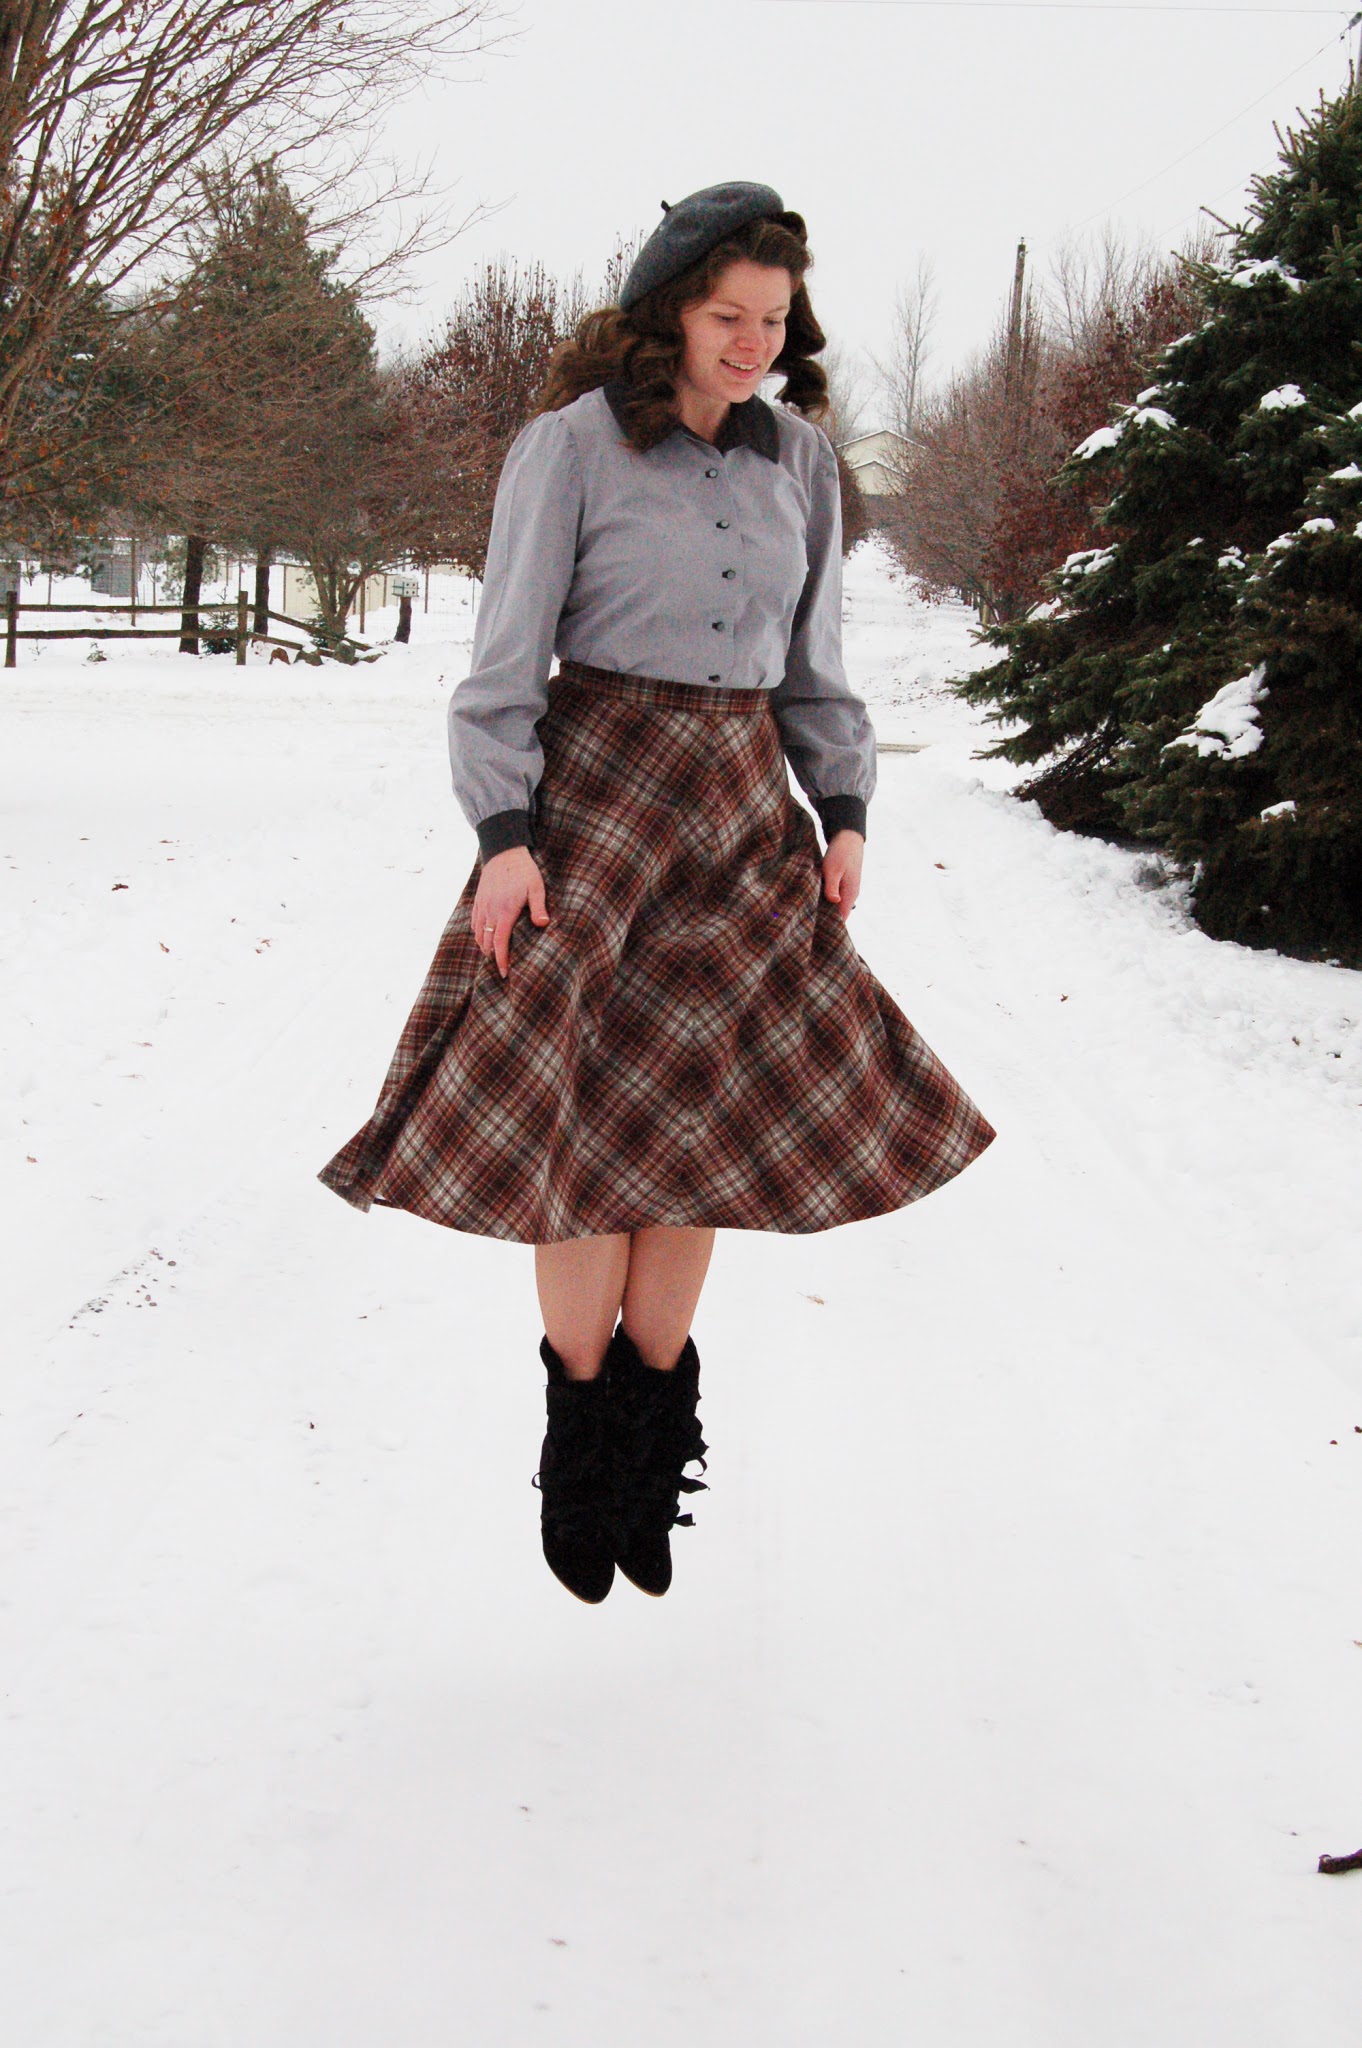
Last year I had a total of 2 winter-friendly garments, those being a wool dress and a flannel skirt.  This year, although I'm not exactly rolling in woolen garments, there has been a great increase in them, which makes me soooo happy!  I have been planning a fall/winter wardrobe for ages, but in the past, whenever the time came to actually sew it up, I either got busy, catastrophe struck, or I just felt like making fruit-covered sundresses.  ;)


I found this grey fabric at JoAnn a couple of months ago in their Famous Maker line.  I ended up getting it for something like $3 per yard because of the coupons we had, and it is not only 100% wool, but also made in Japan and 60" wide!!  Can't beat that!!


I used Simplicity 8250 for the skirt, but simply cut the front on the fold and omitted that extra seaming/foldover/topstitching business.  Somehow it seemed like that would have been terribly bulky in a heavier-weight fabric like this.  I also omitted the gigantic circuitous pockets....and skipped that wacky waistband.  So I guess you could say I based it off of S8250.  ;)


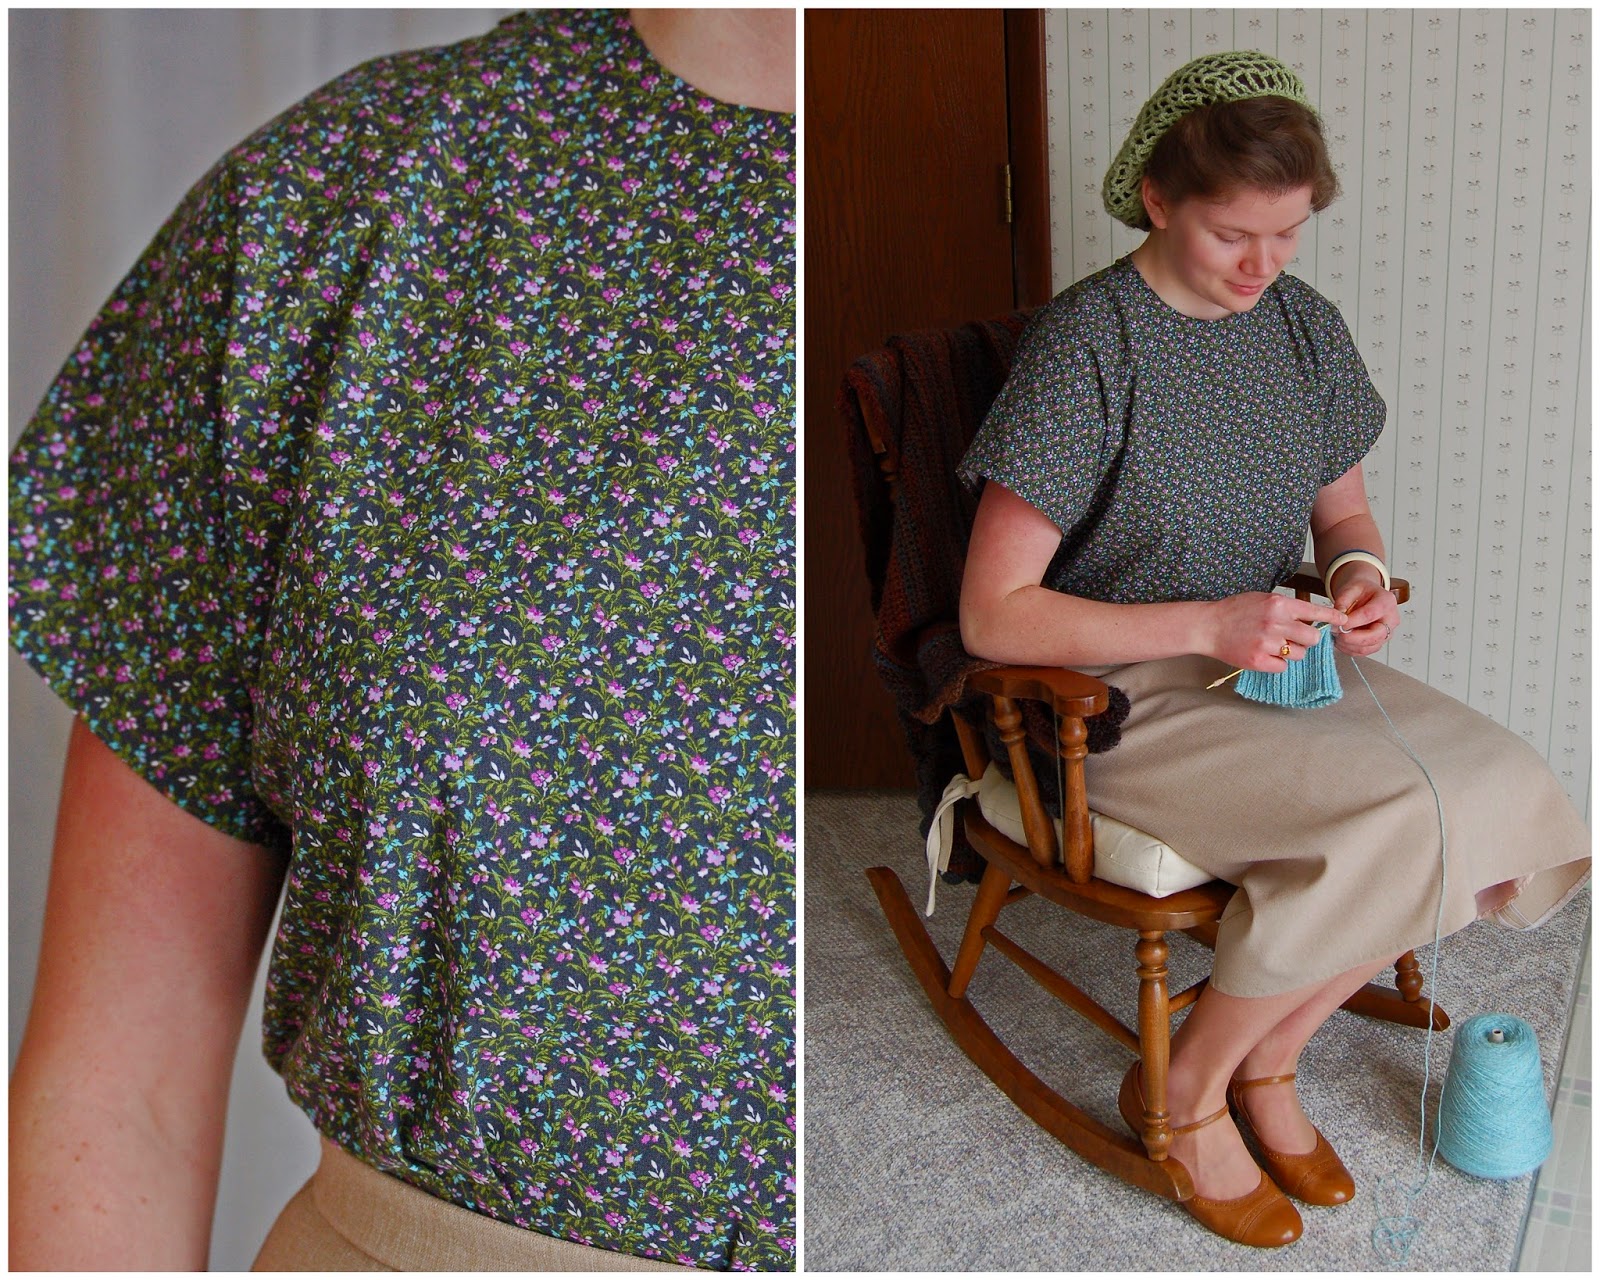
This sweater is so much fun.  I purchased it from Paper Luna Vintage at the same time as my mustard sweater, but this one had numerous moth chews on it, so I got it for an extra-good deal.  I set it aside when it arrived, though, because I really had no idea how to mend the holes.  I finally buckled down and decided to tackle it one day (the same day as I remade my fall skirt and cream blouse, incidentally; that was one awfully productive day in the mending realm!), using some cream colored yarn I found in our stash, a small embroidery needle, and our needle felter.  First I weaved the yarn in and out, catching the loose stitches, and kind of weaving it closed, and then I took that mended spot, laid it on the needle-felting pad, and felted it a bit, just to kind of blend the stitches and secure it together.  It worked quite amazingly well, and the spots are not really even noticeable anymore!!


This spot on the arm was the worst one; it was literally a gaping hole with a good 1/2"-5/8" of knit missing.  I weaved it shut and felted it though, and it came out pret-ty good!  ;)


The beading details on this thing are downright incredible.  I just can't imagine having the patience to do all that!!  The brand is "Broadway, Suburbanite Sportswear," dating from the 1950s.  The fun part is, while working on it I found a paper tag sewn inside the lining with the original price of $2.98 on it.  Hahaha!  Hard to even imagine such a thing these days!!


In the last few posts featuring '50s skirts, I've been wearing both my regular Malco Modes petticoat and a tiered flannel petticoat, and I'm really enjoying the fullness it lends!  On top of that fact is how wonderfully warm it is, as compared to nothing but a nylon net petticoat.  Big difference!!  I'll have to do a post on it sometime soon just so you can see the design of it and all.


Thanks for stopping by!  :)
Follow Me on Pinterest

Wednesday, December 21, 2016

• It's All About the Boots •


It's time for the big, exciting, amazing, and long-awaited shoe post.  :D

In short, I have new boots.  And to say that I love them is a definite understatement.


Last month, Royal Vintage Shoes announced that the Victoria Carriage Boots were no longer going to be available on the RVS website, and therefore were on sale.  Well, I have been mourning the lack of any winter-appropriate footwear in my "shoe wardrobe" for a long time, and these were so utterly tempting, I couldn't resist.


The boots are made of velveteen on the outside, with genuine mouton (soooo soft) fur trim, grosgrain ribbon ties, and a quilted sateen lining.  In short, they are the fuzziest, wuzziest, most wonderful boots I've ever owned, or will ever own.  And on top of that, they are gorgeous and oh-so-vintage, instead of looking like bedroom slippers!  ;)

Since the soles are made of leather, I took them in to our (amazing) local cobbler and had him put some thin rubber soles on the bottoms for both durability and traction.  He did an excellent job, and they are now ready for anything winter throws my direction!  I also gave them 4(!) coats of waterproofing/stain-repellant spray, which has worked wonders so far.  All the crunching through snow that I did in this and two other consecutive photo shoots left them dry as a bone; the snow didn't stick to them, and any moisture just beaded off.  Amazing!!!!!!!  :D

The boots are still available on the American Duchess website HERE, but only until the remaining sizes sell out, then they'll be gone forever.


As for the outfit, this skirt is a recent make of mine.  My dear sis Sarah sent me a "just because" package back in January, consisting of a vintage pattern and two different wools, one of them being this plaid and the other a solid brown, which I also recently made into a skirt.  I love wool fabric, plaid, and the color gray, so this was a total winner.  It is so good that I waited practically a year to make it into *just* the right garment!  ;)


I've been making quite a few skirts lately, and am having a blast wearing them.  Before I started making my own clothing, my wardrobe consisted of about 97% skirts and blouses with only about 3% dresses.  Now that I do sew my own clothing, however, the situation has just about reversed for whatever reason!  I am really enjoying adding more skirts and blouses to the mix though; they are so comfortable and very easy to customize for a dressier or more casual look.


For this one, I used a vintage '50s pattern in our stash for a medium-fullness, flared skirt.  I definitely wanted that chevron effect at the front and back seams, and shockingly enough, none of our modern repro patterns seemed to have that!  The pattern I used had the centers front and back directly on the bias, with the side seams being on the straight grain.  It was the perfect pattern for the fabric, because it fit on to the 2 yard piece just right!  :) 


The blouse is a make from earlier this year; you can read about the construction of it here.  


Although I love plaid, I tend to avoid making garments out of it like the plague, because I have so little faith in my matching skills (and rightly so!).  This one was a real confidence-booster though!!  It's always so fun when something comes out just the way you want it to.


Have I mentioned it yet?  I love these boots.  --->SO MUCH<---

Another super-exciting aspect about them is, they not only work great with my everyday vintage wardrobe, but also will work (even more so, if that's possible) beautifully with my historical dresses as well, since the original design dated from the 1860s-1920s.  I can't wait to pair them with a big, fluffy dress.  ;)


This is a pretty good photo to end with; it pretty much sums up the way I feel about my new shoes, and this skirt.  ;D

A big thank you to Sarah (<3) for my gorgeous wool, and also to Lauren and the crew at AD and RVS for the stunning boots!!  I would highly, highly recommend them to anyone looking for wintry vintage footwear; comfortable, incredibly high quality, and downright gorgeous.

****ALSO****
My Etsy shop is having a Christmas sale right now!!  Save 20% off your purchase when you use the coupon code MERRYCHRISTMAS20, valid through Sunday, December 25th.  Stop by the shop and check it out!  :)
Follow Me on Pinterest

Monday, March 2, 2015

1940s Separates • Afternoon Floral


I never dreamed that my wardrobe would consist almost entirely of dresses, but it does nowadays. I love dresses, but sometimes it's nice to have a skirt and blouse to wear as well! I have struggled to find patterns that I liked for both items, but I finally found a couple that I like very much!

It all started when I found a remnant of fabric at our local quilt shop for free. I didn't think when I found it that it would be enough for a skirt, but when I got home, I discovered that it was a yard and a half of 60 inch fabric! I was overjoyed to find that Vogue 1019 would fit in that amount perfectly, and so started sewing.
 The total cost of the skirt was $9.45; the cost of 1 3/4 yards of lining and a packet of seam tape. The thread and zipper were from the stash. The great part about the fabric is, it doesn't wrinkle! I believe it's a polyester, judging from the feel of it. 


I made the skirt exactly like the pattern, except for lengthening it a few inches and adding a zipper. I had never put a lapped zipper in a skirt before, but I'm very happy with the outcome. I used muslin for interfacing the waistband, as the pattern called for. 

The only thing I would change about the skirt next time is putting the zipper in the back, rather than on the side. It lies fairly flat, but it would lay even better if it was in the back. Other than that, I am perfectly happy with the pattern!

Look! Me, knitting!! If I live long enough, it's going to be a '40s jumper. I'm almost done with the ribbing.

After I finished my skirt and discovered just how much I loved it, I decided a new blouse was definitely in order. Only, we don't really have any blouse patterns that work.
Or so I thought.
I decided on a whim to pull out the mockup of Simplicity 1692. I had made it early last year, and tried it on untucked. The result? Not very pleasant! The picture on the pattern cover shows it untucked on the model, but if you look at the picture of the original pattern cover, every view is tucked in.
I tried it on tucked in, and loved it!
Four hours later, I had a blouse.
Hence the name, "Afternoon Floral."
Happiness.


I made view C, making the sleeves 5/8" longer. The neck opens with loops and buttons on the shoulders, and the side opens with a zipper. I very much like this blouse because although it's simple, it's very comfortable and stays tucked in perfectly! I'm already planning a nautical blouse from view D, with that adorable ric-rac around the neck.

The only thing I'll change about the blouse is sizing down half of a size (I'm slowly learning to always go by the finished garment measurements), and making the sleeve holes slightly smaller. They are a little bit bigger around than I prefer them.

Aside from that though, I'm very excited to finally be building my "separates" wardrobe! I can't wait to wear my jabot blouse with this skirt!


With the cold, snowy weather outside, we were forced to take pictures indoors....again. It's not an easy task at our house; we have no dreamy empty rooms with picturesque windows to pose by. Hopefully the weather will warm up sufficiently soon so we can go outside for photo shoots.

• Photography by my mom •


Follow Me on Pinterest

Monday, January 19, 2015

• 1930s Wintry Plaid Skirt •


At last!! I made something wintry!!
It did seem like I never would there for a while, but I'm a firm believer in making whatever kind of garment I feel like, whether it is seasonable or not. Everything just seems to go better that way!
In any case, I did, at long last, make something that is winter-friendly, and I love it! I was starting to desire something warm after freezing to death in little cotton dresses. (Don't worry, I'm still making them left and right.)

I got the fabric last fall, hoping to make something like this skirt. I never worked up the nerve to make it though, so the fabric sat patiently in the stash all these months. I pulled it out with trepidation a couple of weeks ago, wanting to make a skirt, yet not wanting to because of my lack of blouses to match.
I finally set my fears aside and jumped in, figuring that I probably had something that remotely matched it in the sweater department.

I had just finished making another plaid garment (coming up on the blog soon), so I felt slightly nutty jumping from one plaid right into another one. Somehow though, I managed to escape enormous frustration and whipped up the skirt anyway.


I used McCall pattern 6993, but skipped the yoke and just made a regular waistband. I also made the pleats begin about an inch and a half lower than the pattern since I was lengthening it...a lot.


This particular flannel, while being of fairly nice quality, still isn't the greatest, so although I matched the plaids to the utmost of my ability, they aren't perfect. The fabric has an element of almost-stretchiness which made it a little annoying to work with. It's very soft, warm, and comfortable, however, so I can overlook the deficiencies. It has become a definite winter wardrobe staple!

The pattern calls for pleats cut on the straight grain, but I wanted to add a little extra vintage flair to the skirt, so I cut them on the bias. I really like the effect, and I think it would look splendid in a more stable wool fabric.


This little jade brooch was my grandma's. I'm not sure where or when she got it, but it is definitely one of my favorites.

I have made this skirt in a solid color as well, but it is strangely loose in the waist, so before it gets any blog outings, it's going to have to face some revisions. This skirt, I'm glad to say, fits like a glove! :)


I am still on a definite 1940s kick, but I may force myself to take a break from it and venture into colonial sewing. I've got the shoes, I've got the fabrics, now I just need the clothes. And the HSM challenge for this month (foundations) is the perfect incentive to get started. We'll see how it goes! I am almost excited! ;)

Follow Me on Pinterest

Friday, February 21, 2014

The 1 Hour Skirt

Have you ever gotten that "I-must-make-something-NOW" feeling? Well, I got it today. So I made something. AND, it isn't just an apron either! It's an actual piece of clothing. Shocked? 
~~~~~~~~~~~~~~~~
I wanted something super-duper fast, so I checked over at Make it Perfect and found this pattern. I didn't actually use her pattern, but I got the whole idea of the elastic waist from her. I used a heavy-weight knit (part of the ever-growing stash), and some 1 1/4" stretchrite elastic. To get the shape I wanted, I just traced a skirt that I have. Ideally, it was going to be a maxi skirt, but seeing as I had only 1 1/2 yards of fabric, if that, I settled for a midi. I sewed up the edges with a medium zigzag and then just left them - knit doesn't ravel, after all! The waistband I sewed together with a regular stitch (obviously), and then sewed down the ends as well.


For the hem, I serged the edge and then hand stitched it up. That was the time-consuming part. However, with some Bonanza cranked up, it went pretty fast.
^that picture makes it look kinda blech!??^ 


If you are looking for an easy, fast skirt, this is it!
Thanks for stopping by!
P.S. Garden Apron pictures coming soon....taking pictures of something garden-related in February with snow all around and no vegetables, green grass or spring-like materials at hand is a slight challenge. :|


Follow Me on Pinterest

Thursday, June 27, 2013

Chevron Maxi Skirt


So......here's my latest project!! (applause) The other day I wanted a new maxi skirt SO bad, so I decided to make one. I used two yards of Riley Blake Chevron. It is such nice fabric, and the print is very even. 
Now for the tutorial:
There is no you-must-do-it-this-way-or-else way of doing this - pretty much just lay out your fabric and go to town. Here's the instructions anyway.
I'm about 6', and this is about ankle length (not quite the standard maxi length), so keep that in mind when you are making it. After you turn under the waistband, you may want to try it on so that you'll know if it's waayyyy to long or short. 
Lay out your fabric and cut it in half. Next, you need to measure your hips at the widest point, and then add anywhere from 3-5 inches to that, depending on how tight or loose you want it. I would recommend 5 or so - that's what I did. 
Next, mark your adjusted hip measurement 3 inches below the top edge of the fabric. 
Lay a yard stick on the fabric, with the edge starting at your hip measurement mark. Angle the yardstick out to the edge of the fabric in order to create a slight angle. (This is a slightly A-line skirt) Mark with a disappearing marker and baste. 
Now you need to try on the skirt to make sure that it is going to fit in the correct way. Keep in mind that it will have elastic in the waist, so it is going to be large on the waist at this point. 
If it fits correctly, sew or serge just in from your baste line. 
Turn hem under twice (you can make it as large or as small as you want) and sew. This may be a little bit tricky since it is an A-line skirt (sometimes tear-jerking tricky). If you are having problems with "too much" fabric as you sew, just stretch the fabric a little bit as you sew it and it should take care of the problem. 
Turn under the top edge 1/4". Turn it over again 1 1/2". Sew, about 1/8" from the turned over edge, leaving a 5-6" gap in the center back of the skirt. 
Thread the elastic through the waistband. Try on the skirt, and pin the elastic together, overlapping the ends. Sew the elastic together (I sew a square, and then an X inside the square). Tie thread ends. 
Pull all the gathers to the front of the skirt so that your open gap is laying flat. Sew seam, backstitching on both ends. If you want to, you can sew vertical seams on the sides and on the front and back so that your gathers don't move around, but you do not have to. 
You're done!!! This took me about an hour or so, but only because it was just one of those days. Next time it would be a lot faster. Have fun!!


-------------------------------------------------------
Thanks for visiting!! Please follow my blog!


Follow Me on Pinterest

Thursday, March 14, 2013

Another 20-Minute Baby Skirt

So, I made another little baby skirt. I absolutely love this one! It came out really cute. I love how these little skirts are SO easy and fast to make. And with babies, you don't have to be as precise as with adults because babies can grow into whatever you make. This skirt can actually be worn four different ways. It is super cute whichever way you put it on. The tutorial for this skirt is here. Note the slight size difference - the measurements are shown below. Other than that, the skirt is made exactly the same.
I bought three pieces of fabric, each one being 1/3 of a yard. I can get easily three skirts out of this with extra scraps leftover. This is a great project for using up small amounts of fabric.
~Pieces to cut out:
1 piece each of two different floral patterns, with each one measuring 11" wide by 12" long.
2 pieces (zigzag), with each one measuring 6" wide by 12" long.  
Finished Measurements:
17" waist circumference
10" length


View 1


View 2

View 3


View 4
~~~~~~~~~~~~~~~
Have fun with your project!! Let me know how it works out for you.

Follow Me on Pinterest

Friday, March 1, 2013

20 Minute Baby Skirt

 I made this darling little skirt with scraps from an apron that I made (the tutorial for that will be up here in a couple days, by the way ~ and I've got to tell you, it's a real good-un!) This would be very cute in pretty much any color or fabric, and you don't even have to do it in 4 pieces - it can be all one color! It is very easy and quick, which means you can make more than one. Have fun! Let me know how it goes for you :)

You will need:
-4 pieces of fabric (or enough pieces to equal approximately 34")
I used the following pieces:
-2 pieces (polka dot) 8 5/8" x 10"
-1 piece (floral) 7 1/4" x 10"
-1 piece (chevron) 9 5/8" x 10"
-1/2 yd (give or take a little) of 3/8" elastic
Here's the fabrics I used:


1. To begin, serge (or sew) together the long edges of the pieces, creating a long strip.


 2. Next, serge (or if you don't have a serger, turn under) the top (waistband) edge of the fabric strip as shown in the picture.

 3. Serge (or sew) together the two open edges to create a circle.

 4. Turn under (press with the iron) 1/4" on the hem edge of the skirt.

 5. Turn edge under again, this time about 3/8".

6. Turn under the top (waistband) edge about 5/8". (almost 3/4")

 7. Sew the hem very close to the edge (1/16").

8. Sew down the waistband edge about 1/8" away from the lower edge as shown in the picture, leaving about a 2 inch gap for the elastic to go in.

9. Put in the elastic. I made the waist about 17". Sew the elastic together, tuck it in, and then sew the gap closed.  Tie ends and thread them inside. You're done!!! Here's a couple views of the finished product. It looks good either way!


Finished Measurements ~ 17" waist and 8" length.
Thanks for visiting!! Feel free to explore the rest of my blog - there is lots to be had on here! 
Come back again ~ I am always up to something! 
~Dolly~


Follow Me on Pinterest