Showing posts with label Cloak. Show all posts

Wednesday, February 17, 2016

• 1950s Wintry Gray Ensemble •


Also entitled, “The Outfit of UFOs.”
;) This outfit took a very long time to come together, but I’m quite pleased with it now that it’s done! My original plans were for an “ice skating outfit” to wear on our trip to Duluth last year. The colors of the plaid were not only my favorite, but they also happened to be the perfect colors to match my ice skates.

I started making the plaid flannel into a half circle skirt, but soon found that I DID NOT like the way it looked, or hung, or…pretty much anything about it. Into the UFO drawer it went. Or did I hurl it? ;)


Meanwhile I started on the blouse, made out of some coordinating gray cottons from the local quilt shop. I was…extremely confident in my sewing abilities, apparently, because I thought that I would just cut out a blouse shape, sew in some darts, and make myself a beautiful blouse.

The only problem was, it didn’t work. At all. It was too small, the darts were in all the wrong places and were all the wrong sizes, AND I had serged all of the seams. Guess where the blouse ended up?  ;)

Periodically I would pull the blouse and/or the skirt out of the Drawer of Shame and examine its possibilities, but it would soon be rehurled into its chamber of disgrace. Finally, last fall, when I got my 18th century cloak, I got the itch to make one myself! The wool cloak that I have is actually a half-circle with some simple darts sewn in to form “shoulders,” so it gave me the idea that my partially-made skirt could be turned into a cloak! I quickly started unpicking the basted seams, resewing them, and what do you know? It was starting to look fabulous!

The next problem was finding a suitable lining. It just so happened that I had some gray houndstooth flannel in my fabric stash that was formerly destined to be a jacket of some kind. It matched so perfectly, and there happened to be the perfect amount of it, that I just couldn’t resist using it!


I used Simplicity 5794 for the hood, and simply eased the "neckline" (formerly the waist of the skirt) onto it. Since I was lining the whole cloak, there was no hemming involved, just a little spot of blind-stitching! Yesssss!! ;)


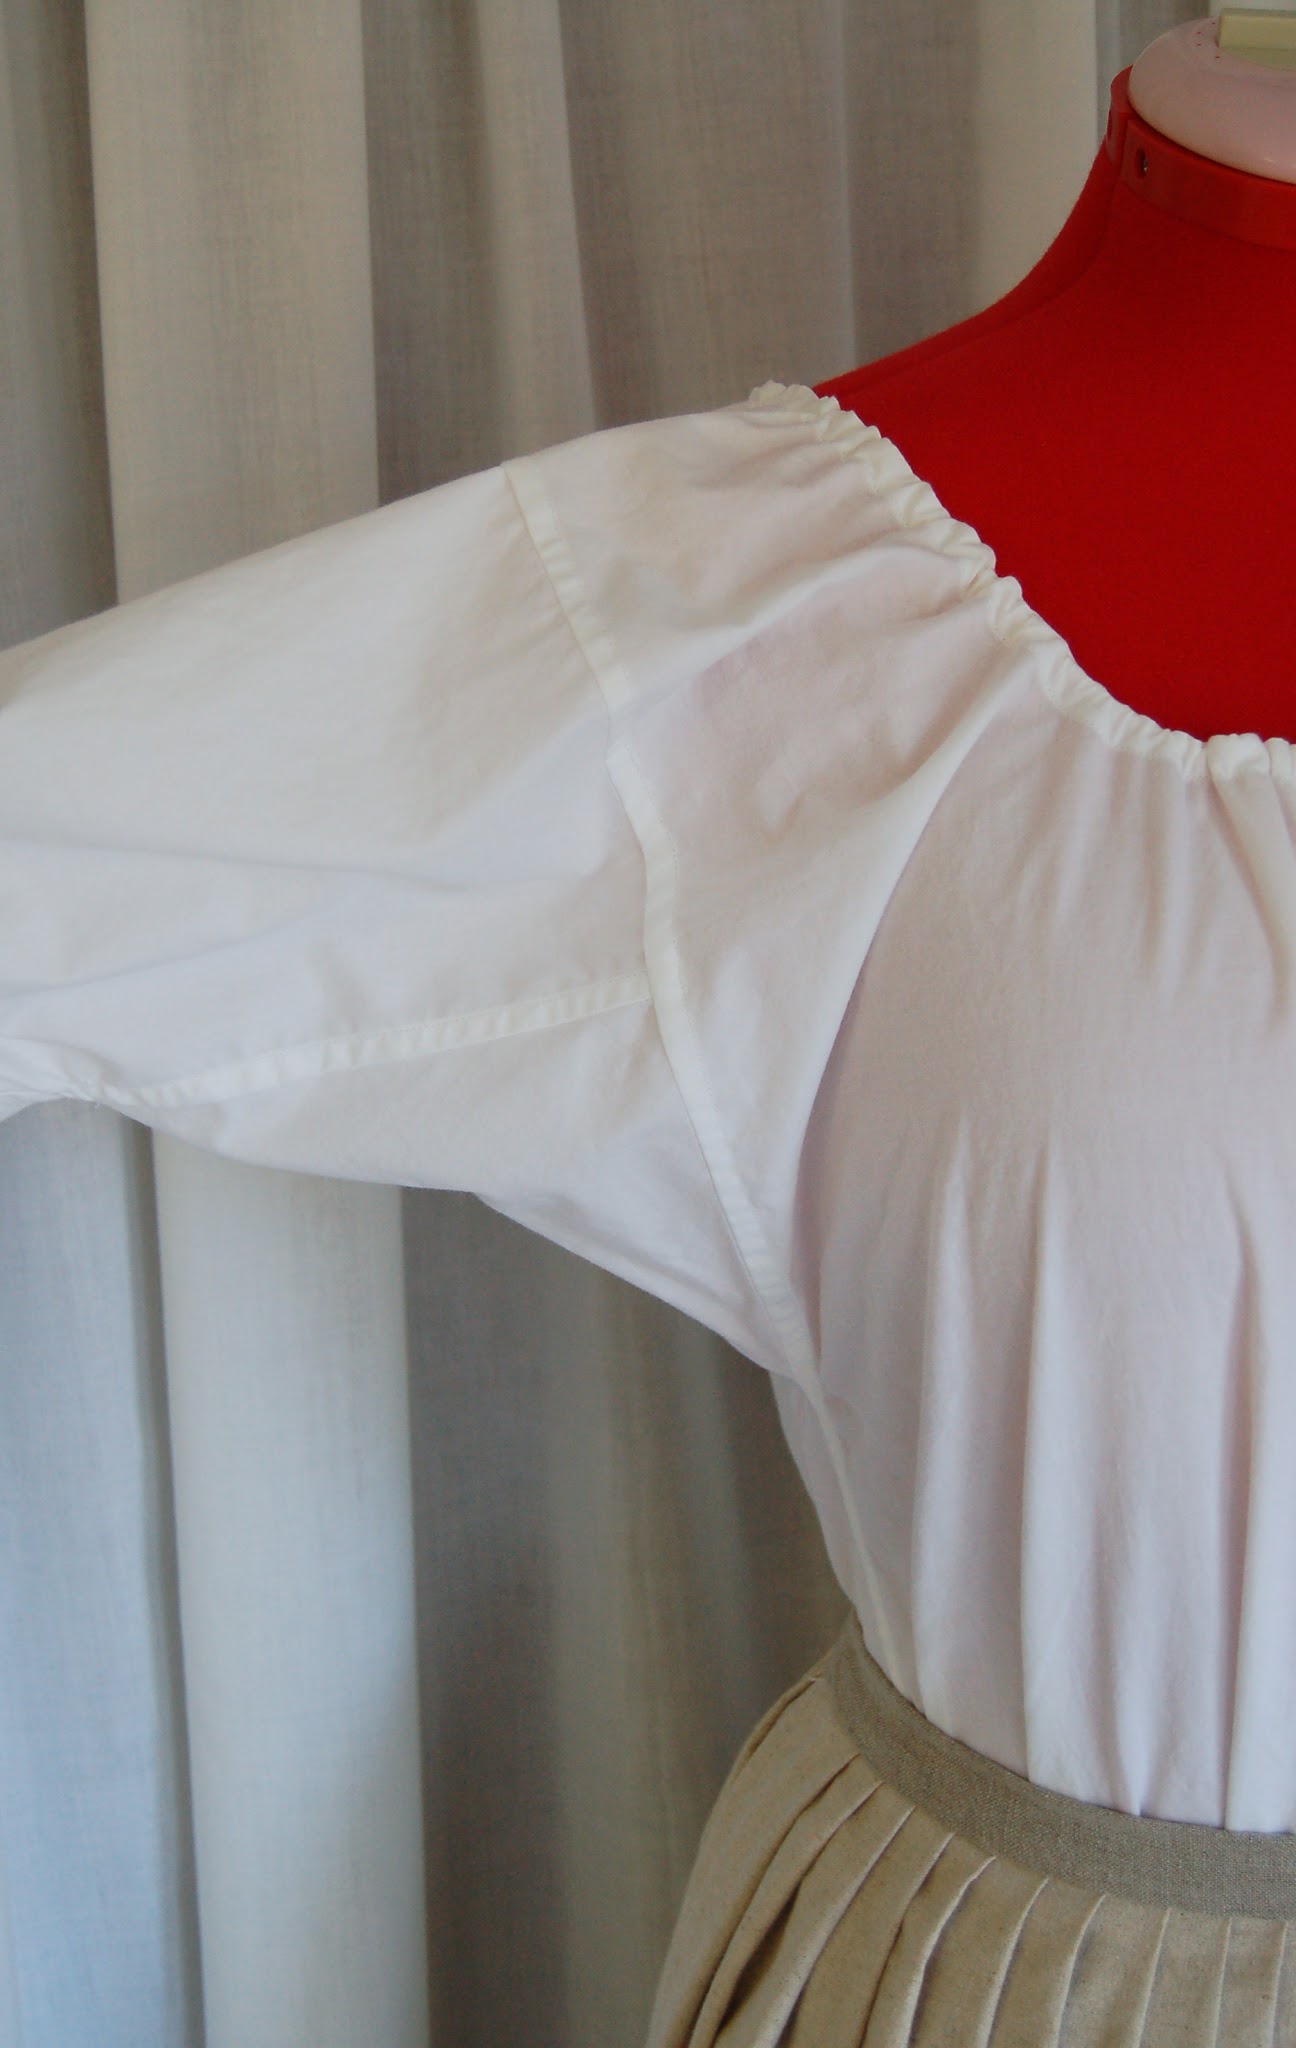
Once my cloak was finished, I decided I wanted to tackle the blouse once and for all. If I recall correctly, I was able to use the original back bodice (minus the ill-fitting darts), and cut out new front bodice pieces from the little bit of extra fabric I had leftover. There was so little fabric left that I had to piece the front bodice at the waist. Thankfully it doesn't show when the blouse is tucked in, and even when when I wear it untucked it doesn't look that out of place. Make do and mend, right?!?


I used a vintage pattern that we have for the collar, and (as far as I remember) just my basic bodice sloper for the blouse bodice. The sleeves are from Simplicity 1692. I decided to do contrasting bound buttonholes, and I really like the effect!! The buttons are vintage. I even have an extra one leftover! The only problem is, it's down under the seat of our car, never to be seen or heard from again. I have this amazing knack for dropping buttons when I'm sewing them on in the car in just the right place so that they are utterly irretrievable. There are...several different ones down in there. ;) Thankfully I still had enough left to finish this blouse.

Meanwhile we are driving around in a vintage button museum! ;)


The back cloak seam came out quite well. :D It's always so fun to be able to match something up and actually have it turn out!


This gray skirt is actually store-bought!!!!! (insert gasps of horror!)

I bought it about 5 years ago at TJMaxx, and have gotten a lot of wear out of it since! Admittedly, it's not the most amazing-looking skirt for vintage wear, but until another alternative comes up, it will do. ;) It's a wool blend, which makes it nice for winter.


It's time for a shoe-admiring break. 
;)
No, really, these are my favorite shoes EVER. I've been looking for low-heeled, everyday-vintage-style shoes for SO. LONG. So when I found these beauties (that actually come in size 11!) from Shoe Embassy, I knew I had to have them. They are made well, immensely comfortable, and they match pretty nearly everything. It does take an eternity for the shoes to arrive, and the customer service at Shoe Embassy is some of the worst I've experienced, but if you do manage to get your shoes, as I did, you'll love them. I ended up with an extra pair of these due to a mix-up, while my mom's shoes were "disposed of" by the Royal Mail authorities. Long story short, don't order two pairs in two different sizes at one time. :| And be sure not to get any kind of shoe spray or protectant, because that is apparently what the Royal Mail system calls "illegal or dangerous items." And it's always a good idea to demolish a pair of shoes because they are in a box with an aerosol can, right? 

Rant ended.


Back to the cloak! :) Here you can see the reverse (houndstooth) side of it, with the blue plaid showing on the hood. It is a very versatile style, and it works for quite a few decades (or centuries!!). I found quite a few examples on Pinterest of plaid capes in the 19th century.  


I'm so glad to finally have pictures of this outfit! I've been wanting to take them for ages, but since we seemingly haven't had a single flake of snow all winter, it's been a long wait for an appropriate background! ;)

Thanks for visiting! I'll be back next week with my mom's version of this outfit! :D

Follow Me on Pinterest

Friday, November 6, 2015

• 18th Century Sewing •


It has taken a long time for this to come about, but we're finally sewing 18th century garments!! At last!! 
Last month, Lily of Mode de Lis listed the JP Ryan stays pattern in her Etsy shop. It was the right size and a good price, so we bought it! It dawned on us shortly afterward that it would be fun to make colonial outfits for Thanksgiving, so we have since started working on our outfits, from the inside out (of course!).

Incidentally, the stays don't really look like anything on Thelma Lou, but that's because she just simply isn't cinch-able. 


We had a nice piece of striped ticking that worked great for the outside of our stays (the same fabric is used on my mom's stays). The "interfacing" of mine is linen; hers is cotton duck.

If you're my friend, you won't look too closely at the binding.....

The stays came together very easily, with the hardest part being sewing on the binding. I'm not exactly itching to make another pair of stays any time soon after that experience! I can only imagine how dreadful it would be to bind them with leather! Ugh!! My fingers would never forgive me if I tried something like that.

I really (really) didn't want to use reed at all for boning; the idea of having it break and having to replace it was NOT a good one to me. So I used 1/4" steel boning instead, and only boned a little over half of the corset. (That still ended up adding up to around 50 bones!) I put boning in next to all the seams, in the tabs, and other essential areas, and the rest was basically just in every other casing. I did sew boning casings all over the entire stays, however, because I found that it added a lot of stability.


I would definitely recommend purchasing the stays pattern one size smaller than your actual measurements. I did, and my stays lace up to within about 1 1/2-2" of each edge right off the bat.

I am a definite fan of this pattern though, as far as 18th century stays go! I absolutely love how the back extends much farther up in the back than the front. And the fact that they have no straps makes them actually practical to wear.

The fabric I lined my stays with is a reproduction quilting cotton (from 1855, incidentally, but it's pretty enough, I really don't care!). It's the same fabric as my garters and the lining of my reticule. You could say I like this fabric. :) In fact, I like it so much, I'm planning on getting more for an 1855 dress!


Eyelets! Their misshapen-ness gives them character. 
Right??! ;)


These first pictures show the stays and petticoat over my regency chemise; I hadn't sewn my colonial chemise yet when I took the pictures, so that's why.

In any case, the next layer is my plain gathered petticoat, which will be handy for several different eras!


My colonial chemise is made of muslin. We didn't have any linen on hand, or a place to buy it nearby, or the time to order it, or the inclination, so we just fudged it with muslin. It works for starters! 

I made it using my self-drafted chemise pattern (yes, I'm still prodigiously proud of myself for coming up with it, especially since I did so very early on in my sewing experience!). The sleeves have gussets, and all the seams are flat-felled.

The sleeves are ridiculously long in these pictures because they have not been hemmed yet. We figured it would make sense to wait until we have our jackets made so we can decide on the exact sleeve length we want. In the mean time though, they just look ridiculous! But that's fine! :)


I embroidered a pink "E" (a fancy one this time!) on the front, but this time I actually had a good excuse! My mom's chemise is exactly the same, so we had to have something to differentiate between the two. Hers, of course, has "Mom" embroidered in blue on the front. ;)


Ahh! The petticoat! I have had this thing partially assembled for....a long time. About a year, in fact! Evidence that I've been wanting to sew 18th century outfits for ages! :)

I had to redo the pleats at the waist though, because the original ones I had made were too big. I seem to have a mental block for figuring out pleats, so I'm always just trying to guess at how big and far apart to make them. Luckily for me, my first guess was the right one! Score!! :)

The petticoat is made out of linen, very nice quality linen, as a matter of fact! It's very nice and thick but also has a nice fine weave. It is about 135" around (equivalent to 3 widths of fabric), but cut crosswise so I could just seam it at the sides for pocket openings. And the 45" width of the fabric makes for the perfect length petticoat once it's hemmed! (No, neither of the petticoats are hemmed....just in case you were wondering!)

(Yes, Thelma Lou's stays disappeared! I didn't feel like taking the laces out just to fit them over her again, so she went without this time) 


The front pleats are pleated towards the center, while the back pleats go the opposite direction. The waistband is also linen, but a different, heavier weave than the main fabric. 


The way 18th century petticoats tie at the waist is so fun! I love how adjustable they are.

Incidentally, since I took these pictures, I started tossing around ideas for a bum roll, and tried socks, as Lily suggested. I really love how it looks! It adds just enough volume to look good, without being as voluminous as a freight train! ;)

On a side note, I didn't forget about hanging pockets! I'm working on embroidering mine, but haven't finished yet. Actually, I'm only on the first one, and I'm still trying to find a legitimate excuse to leave one of them un-embroidered. I haven't come up with anything yet. ;) I enjoy the embroidery, but it's the freehand drawing-on of the pattern that is not my favorite pastime. 


This cap is....rather unorthodox. I used the Kannik's Korner cap pattern, but unfortunately chose some rather too heavy linen to make it. By the time I was half done, I knew it wasn't going to work very well, so I decided to just go ahead and finish it on the machine. It turned out fairly well, considering, and it will work until I find some suitable cap fabric. It's fun to wear, even if it isn't made right! :) And it stays on miraculously well! The only problem is trying to smash my hair into submission under there!


Confession time; I am guilty of committing the ultimate trespass any seamstress can commit. 
I bought a cloak! Dreadful, isn't it!! ;)
I wanted a cloak really bad, but after searching high and low for wool, I decided that it would be cheaper to just buy one than to make one. So I went ahead and purchased the Short Cape from Jas. Townsend. I am very happy with it! The 24" long description makes it sound *so* short, but it is actually the perfect length, and much longer than one would imagine! It falls right at wrist length, which is ideal for being able to still do things without fighting the cloak. AND, it's SO soft and warm.


It has a lovely little collar, and the most beautiful pewter clasp. Jas. Townsend makes their own pewter clasps, in fact! Bonus! :)


It is lined with coordinating blue cotton. I was reading this article about cloaks while I was researching them, and I found it very helpful! Although there aren't very many things niftier than a long cloak, the shorter length really is more practical! And just like the article says, you can swing the front edges back over your shoulders if you get too warm without being strangled. And avoiding strangulation is always nice! ;) 

Ever since I bought my cloak, I've been suffering from a severe case of cloak addiction. So much so, in fact, that I took out a UFO skirt I had in the drawer of shame and refashioned it into a cloak! I can't wait to share photos of that, but I'm determined to wait for a suitably snowy background to take pictures. And at 60-70 degrees, that's not likely to happen just yet. 

I hope you enjoyed this post! :) We're having a blast sewing these outfits. And we can't wait to get started on our jackets....whenever the pattern gets here!

Follow Me on Pinterest