Tuesday, June 30, 2015

• Miss L Fire Shoes for Sale! •


Last year my mom got these (so adorable) shoes for her birthday, but they ended up being the wrong size. *tears*
The style is called "Mildred."
The shoes are a size 40, and fit like a US 9.5/10. My mom wears a 9, and you can see how much too big they are:


The shoes have only been worn twice, in our house, on carpet, with socks, just for pictures, for about 5 minutes.
In other words, they're brand new.


These shoes are SO cute, and they're no longer available in this color or size. They're 100% leather with rubber soles.


The shoes come in the original box and packaging.

Check out the listing on Ebay here.

Happy shoe-shopping! ;)

Monday, June 29, 2015

• Rose Chintz 1940s Dress •


I had several other posts scheduled ahead of this one, but this gorgeous dress of my mom's is such a favorite, I couldn't help making it the first in line!
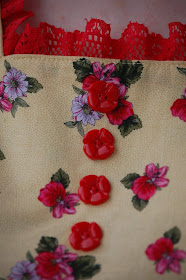
She just made this dress last week, but it's already my favorite garment she's ever made. She found the fabric for it at an antique shop in Wisconsin, and at the time, I really didn't like it. But as soon as I saw it becoming a dress, I fell in love too!


The fabric is only 39" wide, so it is quite obviously not modern fabric, and most likely pretty old. Does anyone know when manufacturers started making fabric wider than that? 
In any case, she happened to have some gorgeous peach (I call them sorbet) buttons that matched the fabric perfectly, so it all came together very nicely. Our green buckle (also shared with my '40s Gumdrop Dress) was the perfect match for the belt.


She used Simplicity 3847 for the bodice of the dress, adding tucks in the front and back for a fitted-at-the-waist style. The skirt is gathered, but I love how it almost looks pleated!


Aaaanndd, this is her grand premiere of bound-buttonhole-making! Fortunately (or unfortunately), she seemed to have caught on to the finer aspects of the art much faster than I did; her buttonholes put mine to shame!


The pleats are only sewn together for about 1 1/2" from the waist seam, but they give it that perfect "shirtwaist" look. So gorgeous!!


The buttons. Yummy. 


She only had 3 yards of the fabric to begin with, but managed to squeeze the whole dress (and belt!) out of it. The scraps that are leftover, however, are not going to make too many little girls' dresses; that teeny pile includes what she cut off of the hem. That's what I call economical sewing!


~
I hate to bring political subjects up on my blog, but what happened last week goes far beyond the realm of politics; our country has indeed been fundamentally changed.
I, as a Christian can not stand by in silence when vile sin is celebrated and uplifted. 
The Bible says, "Woe unto them that call evil good, and good evil..."
The morals of our country are fast disappearing, and if Christians do not take a stand, who will?
Let us pray for our country to turn from its wickedness toward God.
"Finally, my brethren, be strong in the Lord..."

Tuesday, June 23, 2015

• New Items in the Shop! •


I finally bit the bullet and listed the afore-promised sewing patterns! They are all complete and uncut. There are 28 of them in total, from dresses to tops to bottoms, so there's sure to be something for everyone.
Head over to my shop to check them out!!


Monday, June 22, 2015

• Pink Gingham Shirtdress •


Today's post is about a dress made quite a while ago! 6 years ago, as a matter of fact! Back in those days, I hardly knew how to sew a straight line, much less sew a garment, so I asked my mom if she would make me a dress. She did!
It is made out of lovely pink poly-cotton gingham. I'll just go ahead and admit it; I adore poly-cotton fabric. It basically doesn't wrinkle, even with wearing it and never has to be ironed after washing. 
I also adore gingham, so this fabric is definitely a favorite.


I wore the dress every once in a while for a couple of years, but not often because the original sleeves were too tight. I finally decided to just put it away and remake it into something else later on.

Last year, after I made my first blouse, I pulled this dress out of the fabric drawer and tried it on just for fun. I mean, there's no way it would fit anymore, right? Well, the sleeves still didn't, but the dress still fit perfectly! What was the solution? I'll put on new sleeves! I happened to have the perfect sized scraps left to squeeze out some sleeves.


Although it might not be an exceedingly 1940s-looking dress, it does make a very nice housedress, and I wear it all the time!


I borrowed my mom's scarf for the pictures. Maybe I need to more permanently "borrow" it! 
;)


I intended to have some scrumptious new sandals to wear with this dress (and a lot of others).
Long story short; there has-been a pair of Swedish Hasbeens in the house. They weren't here long, however, because they just did not fit! I ordered the Ornament Clog in 11, but the toes were extremely tight, and the heel straps were extremely uncomfortable. Back they went.
So, the long, hard sandal-hunt continues.

Meanwhile, we're keeping busy as bees because there is some amazing music going on in town! Rachel Barton Pine, the amazing violinist was in town performing with the local festival orchestra last weekend, and there are several more weeks of recitals, masterclasses, and orchestra performances with other amazingly talented artists to come. I love it! Aside from the pure enjoyment, it is very inspirational and has prodded me into practicing more, as I should. Three cheers for classical music!!


Monday, June 15, 2015

• Aluminum Overcast B-17 & 1940s Dresses •


Last week, the WWII B-17 Aluminum Overcast flew into an airport nearby us, so we just had to go check it out (and take some pictures by it)! It was an amazing experience!


They were offering half-hour flights, but at $475 per person, that was just a tad over-budget. Maybe next time, right? ;)
Nevertheless, just to be able to go through and walk around the plane was very amazing.


Among other exciting events, we got to meet Captain America! ;) I had heard of Captain America before, but hadn't a clue who he was, what he did, or that he existed during WWII. Now I know!!


My mom and I wore our coordinating 1940s dresses. We actually made them early this year, but never got around to photographing them until now.
I discovered a rather displeasing issue as I started laying out the pattern; the fabric was noticeably faded on the fold, and in several other spots where it had obviously been exposed to the light for too long. That was not very encouraging! I worked around the faded spots as much as I could, putting them in the least noticeable places; near the sides of the bodice, and in the back of the skirt. It ended up being hardly noticeable at all! And what I initially thought would be a least favorite dress turned out to be a top favorite!


This dress is the third rendition I have made of Simplicity 1587. See the first and second here and here. I really like the pattern, but have forced myself to retire it for the time being since I have a total of four different dresses from that pattern.

I love the subtle details of the pattern; the elasticized ruching on the sleeves, and the gorgeous gathered detailing on the skirt. 


My mom made her dress from a vintage Anne Adams pattern. I bought the pattern last year, hoping it would look good on me, but it ended up looking a thousand times better on her. Her buttery yellow flower-laden fabric is just perfect for the pattern!


I found the buttons for her, however, so....don't I get partial credit for the dress??
Aren't they just absolutely delicious?!


The dress looks lovely with or without a belt. The buckle she uses for it is a universal favorite around here; it matches so many different things! 

And now for a few airplane photos!!


A very narrow plank through the bomb bay! 


All in all, it was an amazing experience to be able to get a close-up look at a plane that was involved in WWII. Let us never forget!!

Friday, June 12, 2015

• Keyhole Tutorial •


Hurrah! Hurrah! I'm finally posting the long-awaited keyhole tutorial!
Every time I wanted to photograph the making of a keyhole on a dress I was sewing, I ended up doing something differently or being in too much of a hurry to be able to do so. But my current sewing project (a gorgeous striped 1940s dress) ended up being the perfect opportunity to photograph my keyhole-making method.


You will need the back bodice piece of what you're sewing and a back facing piece to match. Interface the back facing piece and finish the bottom edge.


You'll also need a bias-cut loop piece measuring 1" x 1 3/4".


Sew the loop with right sides together, stretching it as you sew and keeping the folded edge even with the edge of your presser foot. You may want to backstitch just a couple of stitches as you start so you have a secure thread tail to pull later.


Once the loop is sewn together, use a big-eye needle to pull the starting-end thread tails through the loop and turn it. Press the loop piece and shape it into a loop.


Mark the center line of your back facing piece on the interfaced (wrong) side. Mark how long you want your keyhole to be (mine is 4 1/2" long) and make a dot on either side of your center line at the bottom end, almost 1/8" away on each side.


On the neck edge, mark a little line to note where your seam allowance is. Mine is 3/8", but be sure to read your pattern to see what yours should be. Make a dot 1/4" away from the center line on each side, even with your seam allowance. This is where you will pivot when you sew the keyhole.


Now, using a ruler, connect the dots!


The next step is to baste the loop onto your back bodice piece (see note below), having the raw edges even with the center line, and making sure the top edge of the loop is close to but not over the seam allowance. The picture above illustrates where your loop is.

Note: As I was sewing my keyhole, I kept getting the feeling that I was forgetting something. I was. I completely forgot to baste my loop onto my back bodice before sewing the keyhole together! Fortunately, it doesn't require much unpicking when you do that, so I was able to fix it quite easily. However, it's always best to do things the right way, so...don't do what I did! ;)


Next, pin your facing onto the bodice and start sewing!


When you reach the first dot at the top of the keyhole, pivot and start down your marked line.


When you get to the bottom, pivot on the dot again and change your stitch length down to about 2 (smaller than you have been sewing). Stitch to the other dot, pivot, and change your stitch length back up to where it was. Continue sewing up the keyhole in the same manner.


Hurrah! You're nearly there!


Next, snip down the center line marking to the end stitches, snipping very close to but not through them. Make a tiny diagonal cut towards the corner (like you'd do on a bound buttonhole) on each side. 


Notch the curves of the neck edge and clip the corners of the keyhole edge as shown.


Fraycheck the bottom end of the keyhole, putting a goodly amount on but not so much that it runs beyond your stitching lines. Allow to dry.


Turn the facing to the inside, press, and you're done!!


Inside view. 


I'm so glad to finally have this tutorial done; I apologize for taking so long to get to it! This seems to be one of the busiest times of the year around here (hence the missed post on Monday), but it's starting to be a little less hectic, thankfully. I'll be back on Monday!