Thursday, August 29, 2013

Clothespin Apron


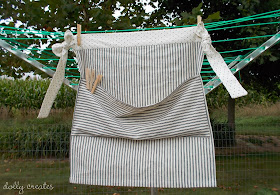
 I finally made my clothespin apron. I always wanted one out of ticking, and it happened! I got this ticking for....
better sit down....
$1.78.
Yeah.
How's that for a great price? 5/8 yard remnant at the local fabric store. Loving it!!
Super simple design - follow the same instructions for a half apron, but do not gather the waistband. For the pocket, simply iron over the four edges, hem the top edge, pin it on and sew!
Super simple. I love the idea of using ticking for a clothespin apron because it's thick and sturdy, and it's so cute too!


Thanks for stopping by!! I'd love to have you link up at my link party!
~~~~~~~~~~~~


I Made That! Thursday #6

Welcome back to I Made That! Thursday! Thanks to everyone who participated last week.

~~~~~~~~~~~~~
 
Sour Cream Pound Cake from Ann's Entitled Life.
This looks SO good! Can't wait to try it. Thanks for linking up, Ann!
~~~~~~~~~~~~~~~~~
How to Bake Banana Cake from Pursuit of Functional Home.
This looks so good too! I am getting hungry. Thanks for sharing, Judy!
~~~~~~~~~~~~~~~
"You Tell Me" by DIY Vintage Chic.
Becca is trying to decide what to do with this swing, and she wants your help!
Can't wait to see how it looks! Thanks for sharing, Becca!
~~~~~~~~~~~~~~
 
Now on to this week's link party!


Sunday, August 25, 2013

Knit Heart Dishcloth

Knit Heart Dishcloth

Yarn: 1 skein Peaches 'n' Cream
Needles: size 6 (4.25 mm)

CO 42 stitches.
Row 1: k across
Row 2: k across
Row 3: k across
Row 4: k across
Row 5: k across
Row 6: k across
Row 7: k across
Row 8: k6, p30, k6
Row 9: k across
Row 10: k6, p30, k6
Row 11: k across
Row 12: k6, p14, k2, p14, k6
Row 13: k across
Row 14: k6, p12, k6, p12, k6
Row 15: k across
Row 16: k6, p11, k8, p11, k6
Row 17: k across
Row 18: k6, p10, k10, p10, k6
Row 19: k across
Row 20: k6, p8, k14, p8, k6
Row 21: k across
Row 22: k6, p7, k16, p7, k6
Row 23: k across
Row 24: k6, p6, k18, p6, k6
Row 25: k across
Row 26: k6, p5, k20, p5, k6
Row 27: k across
Row 28: k6, p4, k22, p4, k6
Row 29: k across
Row 30: k6, p3, k24, p3, k6
Row 31: k across
Row 32: k6, p2, k26, p2, k6
Row 33: k across
Row 34: k6, p2, k26, p2, k6
Row 35: k across
Row 36: k6, p1, k28, p1, k6
Row 37: k across
Row 38: k6, p1, k28, p1, k6
Row 39: k across
Row 40: k6, p2, k26, p2, k6
Row 41: k across
Row 42: k6, p3, k24, p3, k6
Row 43: k aross
Row 44: k6, p4, k10, p2, k10, p4, k6
Row 45: k across
Row 46: k6, p5, k8, p4, k8, p5, k6
Row 47: k across
Row 48: k6, p6, k5, p8, k5, p6, k6
Row 49: k across
Row 50: k6, p30, k6
Row 51: k across
Row 52: k6, p30, k6
Row 53: k across
Row 54: k across
Row 55: k across
Row 56: k across
Row 57: k across
Row 58: k across
Row 59: k across
BO and weave in ends.

Saturday, August 24, 2013

DIY Mercury Glass Candleholders


Yay!! I made mercury glass candleholders! I saw a tutorial for these in a magazine, and just couldn't resist. Here's the good part: I got the candleholders at Dollar Tree, so they were only $1 each!! The mirror paint is Krylon brand - you can get it anywhere that sells paint. It's a little bit pricey - $6.84 or so per can, but it's totally worth it. I got the candles at Meijer - 2 for $3!! Can't beat that!
How-to:
All you have to do is spritz the inside of the candleholder with water, and then spray it with paint. Set it upside down on newspaper and let it dry. Repeat 2-3 more times, or until you get the desired effect. You may want to set it upright one of the times while it's drying so the "watermarks" aren't all traveling upwards. 
It's as easy as that! They would make great gifts as well, and they're definitely a cheap way to make something neat! I've seen them at different places for anywhere from $5-$20. 

Thanks for visiting! I'd love to have you comment and follow my blog. There is a button on the right-hand side of the page to follow on Bloglovin', or to follow by e-mail. Thanks!
Check out my new "About" page above on the left. 


Thursday, August 22, 2013

I Made That! Thursday Link Party #5

Welcome back to the 5th edition of I Made That! Thursday! Thank you to everyone who linked up last week! Check out my latest post, Peach-Raspberry Popsicles. They are so yummy, and good for you too! Also look for a couple of tutorials that I'll be posting later on, how to make mercury glass candleholders, and chalkboard glasses. Thanks everyone!


Lois over at Creative Chaos posted a how-to about this great soap cutter. Such a great idea! I've always wanted to try soap-making, so this would definitely be the thing to have for that. Thanks for linking up!!


Now for this week's link party!!

Wednesday, August 21, 2013

Peach-Raspberry Popsicles

What could be better than a popsicle on a hot summer day?! So here's a really yummy recipe that's super tasty, and good for you too!
You will need:
popsicle maker
blender
orange juice
sugar
peaches
raspberries
1:
Peel 2 peaches. Eat half of one of them. (You only need 1 1/2)


2:
Put 1 1/2 peaches in blender with 3/4 cup raspberries, 2/3 cup orange juice and 2 1/2 tablespoons sugar.
Blend until smooth. Note: Taste it and see if it's sweet enough for your liking.
 I strained my popsicle filling just to get some of the raspberry seeds out, but you really don't have to.

3:
Pour into popsicle mold.

4:
Put in the freezer for about 5 hours. I know....it's very hard to wait that long, but it's pretty necessary.

5:
Remove popsicle mold from freezer and let it sit for about 5 minutes. Run hot water on the outside of the mold to loosen. 
6:
Eat it!!


~~~~~~~~~~~~~~~~~~~~~~~~~
Hope you enjoy this yummy treat! Thanks for stopping by! I'd love to have you comment and follow my blog!
~~~~~~~~~~~~~~


Thursday, August 15, 2013

I Made That! Thursday Link Party #4


I apologize for being really late posting this!! Somehow I thought it was still Wednesday. Thanks so much for bearing with me!! Check out my latest posts, Sewing Room Reveal and DIY Ribbon Board. Thanks for stopping by!!


~~~~~~~~~~~~

Blog Planner II by Pursuit of Functional Home
This is a really great blog planner! I am definitely going to use this. Thanks so much for linking up, Judy!

~~~~~~~~~~~~


Sunday, August 11, 2013

DIY Ribbon Board


I finally got to the tutorial!! Here she goes...

You will need:
a bulletin board
a yard of batting (plus or minus according to the size of your bulletin board - doesn't hurt to get extra and it's really cheap at Joann by the yard) - I don't know what thickness mine is - just kinda go by the feel

a yard of fabric (Joann for mine....HAD to have chevron)
upholstery tacks - I only ended up using 13 of them - so one of the 24-packs is definitely enough. (also from Joann)
two spools of ribbon (I used Offray - I believe they are about 9 yards each - I didn't use all of it but you will definitely need two spools)
stapler and LOTS of staples
pins
four hands ;)
That last one isn't mandatory, but it certainly helps.


~~~~~~~~~~~~~~~


~~~~~~~~
Step 1:
Lay your batting down and cut it approximately 5 inches bigger on all sides than the bulletin board. Next lay your fabric out and cut it the same way. Make sure you do this really careful (especially if you have chevron or stripes like mine) or you will have some crooked bulletin board going on.
~~~~~~~~~
Step 2:
Lay your fabric wrong side up on a large surface, followed by the batting and the bulletin board.
~~~~~~~~~
Step 3:
Make sure everything's nice and straight. Now you want to start stapling the edges down - not too close to the corners. Once you have them somewhat secure, cut a triangle out of the corners (or just fold them if you're not picky). Repeat on each corner. If you have hangers like the ones on my board, snip little holes in the top edge of the fabric and batting and stretch them over the hangers. Now finish pulling everything good and tight, and staple it all down.


~~~~~~~~~
Step 4:
Here's the hard part: the placement of the ribbons. I give all the credit for this step to my mom. I'm more of a just-get-it-done-even-if-it-doesn't-look-perfect type of a person, whereas she is most definitely a perfectionist. Thanks, Mom!!
 Start out with the corners, and get those staples down. You want to pull them pretty tight, but not too tight. After you get those done, measure the distance from the ribbons to the edge of the board, and figure out how many and where you want the rest of the ribbons, and pin them in place. Or just ask your mom. :) Once you have them all pinned on, staple them on the back of the board.

~~~~~~~~~
Step 5:
Now the fun part!! Put in the tacks. Not terribly hard to figure out - just put them in wherever the ribbons cross. You're done!!! I am so happy with how ours came out - it's SO much nicer than a plain, ugly bulletin board. Hope you liked the tutorial! Let me know how yours turns out.


~~~~~~~~~~~~~~~~~~
Thanks for visiting!! Please follow my blog and leave a comment!
~~~~~~~~

Thursday, August 8, 2013

Sewing Room Reveal!!

Here it is!!! Finally!! The big reveal!! I realize this is not exactly a magazine-style looking sewing room, however, the total cost was something like $30. So with that in mind, it's not bad at all! 

Here's some very sorry-looking pictures of 
Before:


Everything was very cramped, the big table was in a different room, and it was just very blah. Not conducive to working at all. Now we have the knitting machines moved into another room (which we're also re-doing, so those pictures will be up in a little while also), and made this just our sewing area. 
~~~~~~~~~~~~~~~~~~~
Here's the after:
 I re-did the bulletin board that you saw in the before picture and made it into a cute ribbon board! Click HERE for tutorial!

The jars of scraps and buttons are useful, while also giving you a little bit of decor.


Fabric stash! Can't wait to make stuff!

 I originally wanted to buy wooden letters and paint them in a chevron pattern, but absolutely no one had the right kind of letters, so I settled for scrapbook paper. Freehand cutting, as you can most likely tell. ;)


 Embroidery hoop art. Very simple to do, and it looks pretty cute. These things are so awesome - you can take the tiniest scraps and make them into this. The two small hoops are fabric samples from a curtain company. The others are from JoAnn. It ends up being a really cheap way to decorate, because even if you have to buy fabric, you only need 1/4 of a yard or so. The hoops run about $1.50.


Couldn't help myself. Who doesn't want to see pink highlighted fabric?!! Courtesy of my lovely Nikon Coolpix. 
~~~~~~~~~~~~~~~~~~~~~~
So what do you think? It's very simple, and not necessarily Pinterest-worthy, but it's a nice, decent space to create in, and very budget-friendly.
I'll be posting the tutorial for the ribbon board in a little while. 
Thanks so much for stopping by!! I'd love to have you follow my blog, and leave me a comment about what you think of the new sewing room!
~~~~~~~~~~~~~~~~~~~~~~


Wednesday, August 7, 2013

I Made That! Thursday Link Party #3

Welcome back to I Made That! Thursday! Sorry I've been MIA for a little while.
Consolation prize, however, is the sewing room reveal which I will be posting tomorrow! And a tutorial for a ribbon board to follow...so hopefully that will make amends. Thanks for your patience!!
Here's a small explanation for why there's been no new tutorials:

First time ever canning with a pressure cooker. Very interesting to say the least. Learned a few things, like how hot pepper feels under the fingernails. Amazing....definitely amazing. 

My own concocted refrigerator pickle recipe. They are also...eh...interesting. We're still deciding if they're really, really good or REALLY awful. I have a feeling they're going to be in the fridge for a VERY long time.
(great photography by the way....award winning in fact) Ha!

Produce from the garden. The potatoes are SO good! 


Beautiful roses from our garden - the scent of them fills the whole room.

Best. Deal. Ever. Scarves on clearance from Kohl's - a whopping $5.60 each. That is a pretttyyy good price for a nice scarf, and they're the perfect weight for summer, fall or winter (or spring). You can pretty much wear them any way you want, including as a shawl. Pretty awesome deal!

Now for the featured craft:


Color Wheel Dress by Nest Full of Eggs
This is such a cute dress that I am sure a girl would love. Thanks so much Rachel!
Now to the link party!! Thank you all so much for your participation! I really appreciate it.